Hi, everyone! Heidi here, and I’m so happy to be back with you as a guest designer for Whimsy Stamps! Today I’m showing you how you can create two different Christmas cards using a few gorgeous Whimsy Stamps stamp sets. Let’s get started!
Card 1: Step 1:
For my first card, I started out by stamping the adorable image from the Whimsy Stamps “Ellie Jungle Bell Rock” stamp onto Strathmore Bristol Smooth Surface Paper using Versafine Onyx Black ink and clear heat embossing afterwards. This way my lines stay black and crisp even if I add lots of water to the paper.
Then I started colouring the image with my first thin layer: for this I used my Spectrum Noir Aqua Markers in the colours Crimson, Spice, Peach, Jasmine, Slate, Tan and Charcoal, in combination with an aqua brush. I’m mapping out where my highlights and my shadows will go. Each of the elephants I’m colouring a slightly different tint of gray brown.
Step 2:Next I’m working on deepening the colours using the same colours as mentioned before and also adding SN Aqua Markers in Burgundy, Terracotta, Sunflower, Moss and Aquamarine, trying to create deeper shadows and keeping my highlights as light as possible.
Step 3:
When the colouring is done, I add some highlights using a white Gelly Roll Pen, and then I fussy cut the image leaving a small border.
Step 4:
Now that my main image is done, I’m working on my background: for this I die cut a square panel one size smaller than my card base. On this panel I stamp the Whimsy Stamps “Falling Leaves Background” stamp using VersaMark ink (this is a sticky ink), and then I heat embossed with a gold embossing powder.
Step 5:
I stamped my sentiment from the Whimsy Stamps stamp set “The Nutcracker” onto a smaller rectangle panel using my MISTI and also created a slightly larger panel from matching red coloured card stock.
Step 6:
Now I’m ready to put my card together: I adhered the two smaller rectangle panels together using liquid glue. Around the green background panel, I wrapped some matching gray brown ribbon twice and adhered on the back using regular tape. This background panel I adhered to my creme-coloured, linen-textured card base using one millimetre thick foam tape. To finish my card, I adhered the combined rectangle panels using one millimetre thick foam tape, and then I finally added the cute elephants on top using liquid glue.
Card 2: Step 1:
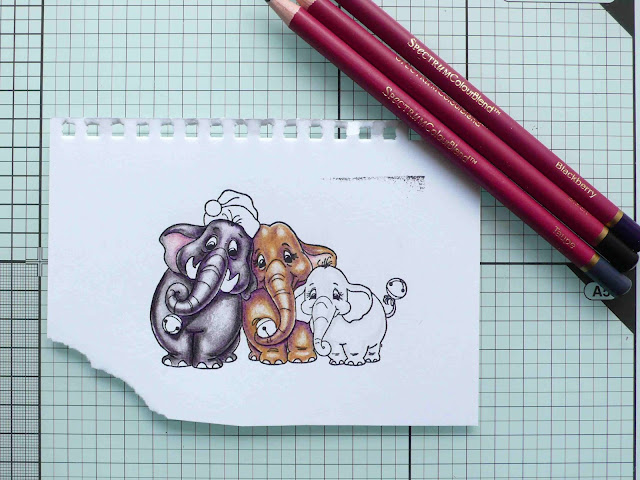
For this card I also started out by stamping the elephants from "Jungle Bell Rock" onto my paper, this time I’m using Canson 1557 paper. Like with my other card, I also start my colouring process by adding the shadow parts first using a light hand. When I make a mistake, this way I can always correct it in a later step. I’m starting with my Spectrum Noir Colourblend coloured pencil colours in Smoke, Stone and Pewter.
Step 2:
Then I decided on colouring the middle elephant first: for this I added the colours Rose Peach, Espresso, Ginger, Maple and Blackberry in the mix. I used Blackberry, which is a purple colour, to create my deepest shadow parts.
You can always use a small eraser to bring your highlights back up a bit, unless you used a too-heavy hand too soon!
Step 3:
For the most left elephant, I then used the Pewter colour I mentioned before, in combination with Black, Taupe and Blackberry again.
Step 4:
Because I wanted each elephant to look different but also complimenting the other two, I mixed colours I used on the first two elephants and added in some Copper to colour my third elephant.
Step 5:
To finish the image I also used Lemon, Maize, Smooth Jade, Raspberry and Earth. Then I decided I also needed some presents on this card: for this I used the presents stamps in “The Nutcracker” stamp set and coloured them using the colours mentioned before.
Step 6:
Then I fussy cut all the images leaving a small border and added some Glossy Accents to the bells and the bows and the dots on the one present and then set them aside to dry. In the meantime I’m working on my background panel: I die cut a panel two sizes smaller than my card base and decided on my lay out. I first stamped one of the sentiments from the Whimsy Stamps “You’re My Jolly” stamp set and then added some snowflakes in the colour Distress Ink “Tumbled Glass” using one of the snowflakes from “The Nutcracker” stamp set.
This background panel I adhered to a slightly larger red panel using liquid glue and then I adhered this combination to a white card base. To finish the card I only had to adhere the elephants and the presents on top using liquid glue and one millimetre thick foam tape!
And that's it for today's projects!
Thanks for joining me today. I hope you enjoyed it, and I will see you again soon!


Stunning cards ad great coloring of the fab stamps.
ReplyDeletexxx Margreet
Dankjewel Margreet!
DeleteAwesome coloring of this cute image! Love the backgrounds too!
ReplyDeleteThanks so much Denise!
Delete