Showing posts with label Ellen H.. Show all posts

Bonus Bundle Fun

Hello friends, welcome to another blogpost. It's Ellen here. I'm excited to show you two cards with a Whimsy Stamps Bonus Bundles. You can find kits in the shop, these bundles are a group of stamps and dies you can buy for a more affordable price ($ 34,99). Below you see the "Autumn" and "Holiday" bundles that I used for making my cards.


For this card I used most of the time the "Holiday bundle". first I cut out the snowflakes from masking paper and did put them down on my card base. After that I did go over my masks with white ink and took them off the card base. Then I sprinkled white ink on top of de card base and finished of the card with the rest of the dies and stamps from the bundle.


On the second card I made a background by using the stamp set (the leaves and berries) and Hand Stitched Nested Rectangles from the "Autumn" and "Holiday" bundle. Further I cut out velume the Doodled Doily Die and on top of that a circle I did die cut out the wreath and some extra's. The senitmend is made by the stamps of both bundles. Finished off the card with an enamel dot on top of the flower.


In my opinion the items from these bundles are picked out very carefully; a lot of these items belong to my favorites and they go so well together. So I hope you liked my inspiration on them.

Penguin Tag

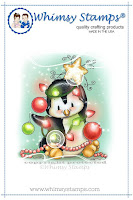
Hello there! It's Ellen here with another Whimsy Stamps project. Today I show a tag with this cute little pinguin.

  
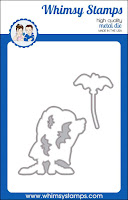
It was super easy to make. First I colored the penguin, than I cut out the tag and gave it some color with Distress ink. After that I did die cut a little snow hill and put it all together. The stamp is just perfect for a tag like this.
 

Enjoy your weekend!

https://whimsystamps.com/products/penguin-christmas-tree?rfsn=713494.f11764 https://whimsystamps.com/collections/border-dies/products/pierced-border-trio-dies?rfsn=713494.f11764

31 Nights of Halloween - Night 27: Treat Decorations


Happy & spooky Friday, it's Ellen here. Today it's my turn to show you something special. I didn't see some treat bags yet, so I thought that was the perfect moment show some ideas.


The first bag I will show you a craft bag that I decorated the bag with the "Boo to You" stamp set and the "Dracula I Compel You" stamp and dies set. The rectangle background was created with distress ink, water sprinkles and white ink. The grass did go further than the square (that's what I wanted). On top of the square I placed the sentiment and of course my cute witch. At the end I placed the bats.
.

The second item is a tag for a glass jar. The little kitten from the "Boo to You" is just perfect for a little tag. The tag was made the same way as the craft bag.

I think this kitten is adorable and they go perfectly together as a witch-team, for sue when you use the same colors for their outfits.


I hope you enjoyed my little post and be sure to check out all the other fun posts.


https://whimsystamps.com/products/boo-to-you?rfsn=713494.f11764 https://whimsystamps.com/products/dracula-i-compel-you-die-set?rfsn=713494.f11764 https://whimsystamps.com/products/dracula-i-compel-you?rfsn=713494.f11764

Stretch Your Stamps

Hi there, It's Ellen here today I have another card with a perfect example how to stretch your stamps.             
I used the lemonade can and glass from the "Squeezed" stamp set. You can use them perfectly for iced coffee with oranges (I guess I need to try this once). Also the letter dies makes it possible for writing down what you want and stretch the theme of your card...
 
I finished it with a perfect sentence inside the card...

I'm so happy when I stretch my stamps, because that makes your stamp so much more worth. That's why I encourage you to do that too.

https://whimsystamps.com/products/brush-script-uppercase-alphabet-dies https://whimsystamps.com/products/new-brush-script-lowercase-alphabet-dies https://whimsystamps.com/products/new-squeezed-dies-set https://whimsystamps.com/products/new-squeezed https://whimsystamps.com/products/new-need-more https://whimsystamps.com/collections/whimsy-craft-supplies/products/new-christmas-cheer-enamel-dots

Day 17 of the Whimsy Stamps Countdown to Christmas

Eeeeps sweeties, I have another Christmas card for you. For this card I made a little snow scene with the "Led by Love" digital stamp, "Holiday Mini Sentiments" clear stamps and the "Bold Banners" dies.


I first made the background with distress ink with sprinkles of water and white/blue ink. The snowflakes on the background are made texture paste. After that I colored these two cute critters with my Copic markers. With a little glitter glue I finished the heart. At the end I cute out the flishtail banner and embossed a mini sentiment on it.

 I hope you loved this little winter wonderland.

Day 9 of the Whimsy Stamps Countdown to Christmas

Hello everyone, it's Ellen here!! Did you see all the Christmas countdown posts already? Today I like to share how you can use a Christmas stamp in a totally different way.


If you cut out the wreath from the "Owls on a Wreath" stamp it looks like two love birds. The new card builder "Hearts Of Love" has perfect elements to go further in the love theme. I used the card base as well as the word 'love' from that set. The banner from "Many Thanks" card builder was perfect to put my sentiment on and a perfect place for my owls. The pink enamel dots from "Its A Party Enamel" are where also so much fun to use on this love card.


I hope you love this idea to stretch your stamps. Have a wonderful day!

DIY: Christmas Ornament

Hello creative peeps! It's Ellen here!! In this post I like to share how I made an ornament with my favorite Whimsy Stamps dies: Sketched Elephants & Brush Script Lowercase Alphabet. I would love to show you the tutorial below.


1. Cut two hearts and letters out felt with dies. Of course you can use other shapes (e.g. a star). In my explanation I talk about the heart.

2. Make words with your letters and glue them down on the heart. I use "Glossy Accents" for it.


3. Start to sew the two hearts together. I used white treat, I wish I had red, because I'm not the best at sewing (hihi)...

4. Fold the ribbon in half and sew it securely between the hearts.
 
5. When you're almost all the way around, stop and fill the heart with wimps. Sew your heart further and tie the string onto the start point from the starting point of the wire.

Here you can see how mine looks:

I think its super fun to make with kids.

Make a Background With The Snow Flakes Dies

Good morning everyone!!! It's Ellen here with a colorful project featuring Whimsy Stamps items. First made a background with the "Snow Flakes" dies. Below you can see how I did that:


To make the background you first merge the ink from light to dark. After you blended all colors you sprinkle the paper with water drops. Than you die cut 2 times each size from the snow flakes and place it on your square. After that it's time to glue it down with some liquid glue.


The sentiment from the "Scripty Occasions" was embossed on a banner from the "Many Thanks" die set. Some twine and pretty glitter "Winter Wishes" enamel dot's made the card gorgeous.
Here you can see a close up:


Thanks for stopping by!

DIY Back to School Gift

 Hi all! Ellen here, I'm here with a little back to school gift made with the new "School Time" stamp set from the latest release on Whimsy Stamps.

Whimsy Stamps

In Belgium
schol just started again. That's why I like to send the smallest among us a positive vibe to go back to school.
Admit, what's more fun than a box of chewing gum?


See you soon!!
P.S. Don't forget to chech the blogpost below: Sharing Handmade Kindness :).

Watercoloring with Elephants

Hello everyone!! It's Ellen here that started to get inky again and used watercolors for this card made for Whimsy Stamps.


First I colored the elephant and the two peanuts with watercolors (Sketched Elephants & Sketched Elephants Dies). After that I did cut the middle piece and embossed the background. The tittle was stamped out on the circle (Bold Statements). I really love the different colors in the tittle. Finally the bow and sequins gave the card a gorgeous appearance.


Thanks so much for stopping by and spending some time with me!

P.S. Don't forget to check out the Whimsy Stamps Facebook Event next week. There will be shown a lot new products and fun games to win some Whimsy Money!!

Wishing You Fair Winds

Hi there! It's Ellen here that takes over the Whimsy blog today. I like to share an encouraging card. This card was made for my older brother. He is going to live in his own apartment very soon and of course I want to wish him the best.


I mainly used images from "Ocean Journeys" & "Ocean Journeys Sentiments" and put them up on top of each other. Here is a close up:
 

See you again! 
http://www.whimsystamps.com/index.php?main_page=product_info&cPath=30&products_id=3803 http://www.whimsystamps.com/index.php?main_page=product_info&cPath=30&products_id=3864 http://www.whimsystamps.com/index.php?main_page=product_info&cPath=81&products_id=3860 http://www.whimsystamps.com/index.php?main_page=product_info&cPath=81&products_id=3859