Whimsy friends,
welcome back to another Digital Team Tutorial!
We have the lovely Sandra Peterson sharing a tutorial with us today
and I absolutely LOVE what she's chosen to do!
Check out this stunning creation!
I'll hand the post over to Sandra now
to share her fabulous tutorial with you...
Hi crafty friends, it is Sandra from the Digital Divas here today showing you a gorgeous
star folded gift box you can perfectly use for wrapping up some of your Christmas gifts.
Materials needed:
2 sheets of cardstock in 8 1/4" x 5 3/4"
Cardstock for the bottom of your box
Glue
Scissors
Bonefolder
Score board
Crop-A-Dile or something similar to punch holes in paper
Ribbon, Ribbon Bow, Embellishments...
This is a sketch you can use as an overview
Score on the long side at 2" / 4" / 6" / 8"
Turn paper and score on the short side at 2 1/2" and 5"
Score a diagonal line as shown above
Score another diagonal line as shown
Score a straight line from the top of your cardstock to the the point
where the other 2 scored lines you did before cross

Cut the cardstock at the bottom and cut off the marked paper as shown in the pic
It should look like this
Fold all straight scored lines
Fold all diagonal scored lines
Fold the straight line above the 2 diagonal folds, it should look like a roof with an antenna
Do all the steps for the remaining 8 1/4" x 5 3/4" piece of cardstock again
You´ll have 2 identical pieces of folded cardstock now
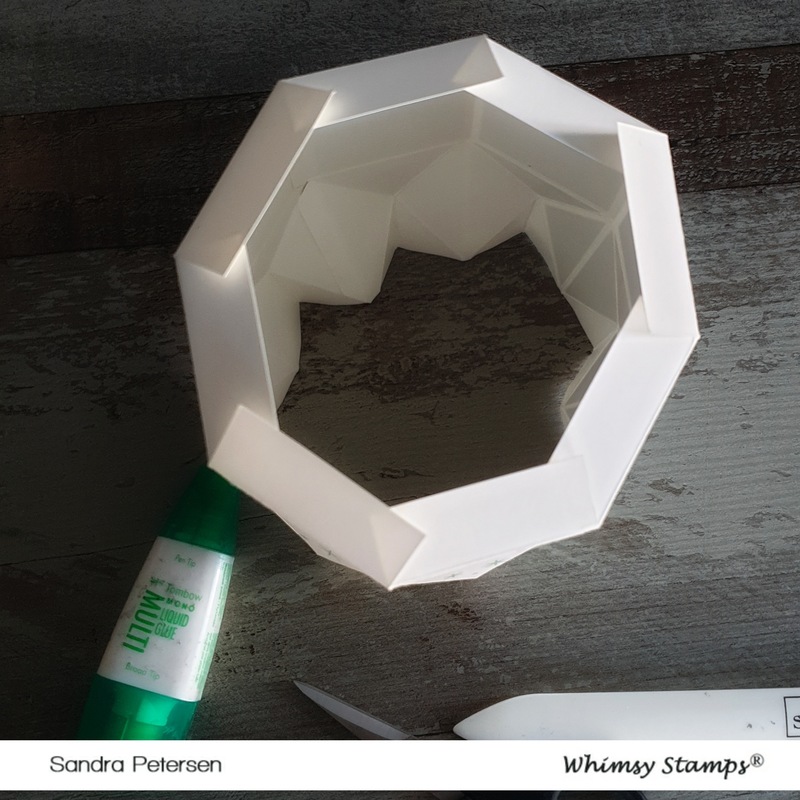
Glue the flaps of one piece of cardstock and stick it to the second piece of cardstock
After that it looks like this
Now it is time to add the design paper
Cut 8 pieces in 2 1/4 " x 1 3/4" and glue them to your box
Cut 8 pieces in 2 1/4" x 1 3/4" from your Design Paper
Draw diagonal lines on the back of the paper pieces as shown in the pic
You'll get 4 pieces out of 1
You need 8 small triangles and 16 larger triangles
Glue them to the box
Put glue to the remaining flap of your box and close it by putting one side above the other side

Your box will look like that
Top of the box
Bottom of your box
You need to punch holes in the top flaps of your box so you can pull some ribbon to close it through
Punch a hole in the middle of your flap as the arrow in the pic shows it
I used my Crop-A-Dile to punch all the holes
Now it is time to add a bottom (inside/outside) to your box
Take some cardstock of your choice and the compass/dividers
and draw 2 circles with a radius of 2 1/4" each and cut them out.
You could also use the largest die from the
as it is the right size at 5" in diameter.
Glue one to the bottom (outside) of your box
Glue the second to the bottom of the inside of your box
Pull the ribbon of your choice through the punched holes, tighten the ribbon and close your box
Add some embellishments or just a ribbon bow for decoration to your box and you're done!
I hope you had a lot of fun crafting with my tutorial and I would love to see what you make!
Have a great crafty day.
Hugs, Sandra
Thank you so much to our lovely Sandra!
What a fantastic tutorial and a perfect box for gift giving this Christmas.
Now we just need to convince Sandra to show us how to tie those magnificent bows!

We will be back next week with our final post for November.
I know, I know, Christmas is scarily close now! I'm in craft overdrive!
Remember, if you make your own version of this fantastic gift box from Sandra's tutorial,
be sure to come and share it with Sandra and us all in the Whimsy Stamps Facebook Group.
Hugs and happy crafting from Sandra, me and all the
Whimsy Stamps Digital Design Divas!
loading..


No comments
Thanks for joining us here today at the Whimsy Stamps Blog. We hope you become inspired to visit with us again and again. Thanks for leaving your comment.
Have a great day,
Your Whimsy Creative Team