Showing posts with label Birthday Card. Show all posts

Tuesday Tutorial - Step Up Your Stenciling

Happy Tuesday!   It is so easy to create a new look with your supplies by combining  them in different ways.   I will show you today how to ink blend underneath your glimmer paste to give you a whole new look.   This is one of my favorite things to do and really very easy.   I have a video below to take you through the process and then create two cards using the Penguin Poop stamp set along with the Sun Rays Stencil. 


It's really easy to create multiples of this design to quickly stock up on your birthday card stash.   I used the Paws and Bones Border Die along with the Grass and Cloud Edger Die to create my snowy bank for these cute penguins! 


I share some quick Copic coloring these very cute images.  Ink blending first and then adding glimmer paste changes the whole look of the card.   I have another card on my blog here where I ink blended with the stencil and then layered glimmer paste on top.   
I hope you enjoy the video!  Thanks for stopping by! 


Penguin Poop Clear Stamps - Whimsy StampsGrass and Cloud Edger Die Set*NEW Paws and Bones Border Die Set - Whimsy StampsSun Rays Stencil - Whimsy Stamps

Tuesday Tutorial- Let's Make a Moon Out of Cheese!

Hello there!
I hope you are finding the Tuesday Tutorials useful
during our quarantine! I have learned some tips and tricks from
these talented ladies!
I love finding other ways to use dies...let's use it as a stencil!
Whimsy Supplies:


Let's begin...die cut the Swiss Dot die as your stencil.
 Mask a piece of cardstock with a crescent shape ( don't throw away the crescent shape, 
they'll need this later). 
Ink up the base with iced spruce distress oxide ink. Leave the mask in place. 
Secure the Swiss Dot die cut stencil over the crescent
shape and ink it up with evergreen bough and chipped sapphire 
distress oxide inks.
 Remove the die cut stencil and background mask. Using the crescent shape you cut earlier,
mask the moon and ink up the background with shaded lilac distress oxide ink.
Remove the mask over the moon and splatter the card with white, black and gold paint.
After the paint set, I embossed the sentiments. Than I adhered the decorated card panel to the card base, 4 1/4 x 5 1/2.
 I stamped the worlds cutest aliens with black ink and used Copic Markers to color.
Here are the shades I used:
two- eyed alien: RV63, RV66, RV69, YG00, YG21, BG11, BG45, BG49, N1
star: RV63, RV66, RV69, BG11, BG45, Y26, Y28, N2
alien in space ship: BG11, BG45, BG49, RV63, RV66, Y26, Y28, N2, G00
I fussy cut the images and adhered them with foam tape. I added some shimmer with 
stickles glitter glue and scattered some sequins.

Well, that's it for me today!
Hope you give this a try and show us what you create!
Stay safe!!
Swiss Dots A2 Die - Whimsy StampsOver the Moon Clear Stamps - Whimsy Stamps

Dragon Party with Special Guest Michele Kovac

Good morning!
I am excited to share that I am a guest designer for Whimsy Stamps this month!
They have the cutest stamps evah! 
I love this little dragon stamp called, Dragon Party....because who does't love a dragon bringing presents and a balloon? 


I stamped the image using Tim Holtz Vintage Photo ink onto kraft card stock and then colored it using Prisma colored pencils. I added some fun fluff to his party hat using a white gel pen.


The image was so fun that I kept the layout fairly simple and layered over black and orange card stock.  I tied orange grosgrain ribbon with black twine.  For the center I had this random little squishy flower that was at the bottom of my drawer.......so of course I have NO idea who made it! LOL! But it matched perfectly, so I used it! 


I hope you enjoyed today's post because there will be many more to come this month! ;)
I welcome you to come and say hello at my blog any time.  Have a wonderful day my friends!

Dragon Party Rubber Cling Stamp

Inlaid Die Cuts with July Paper Door


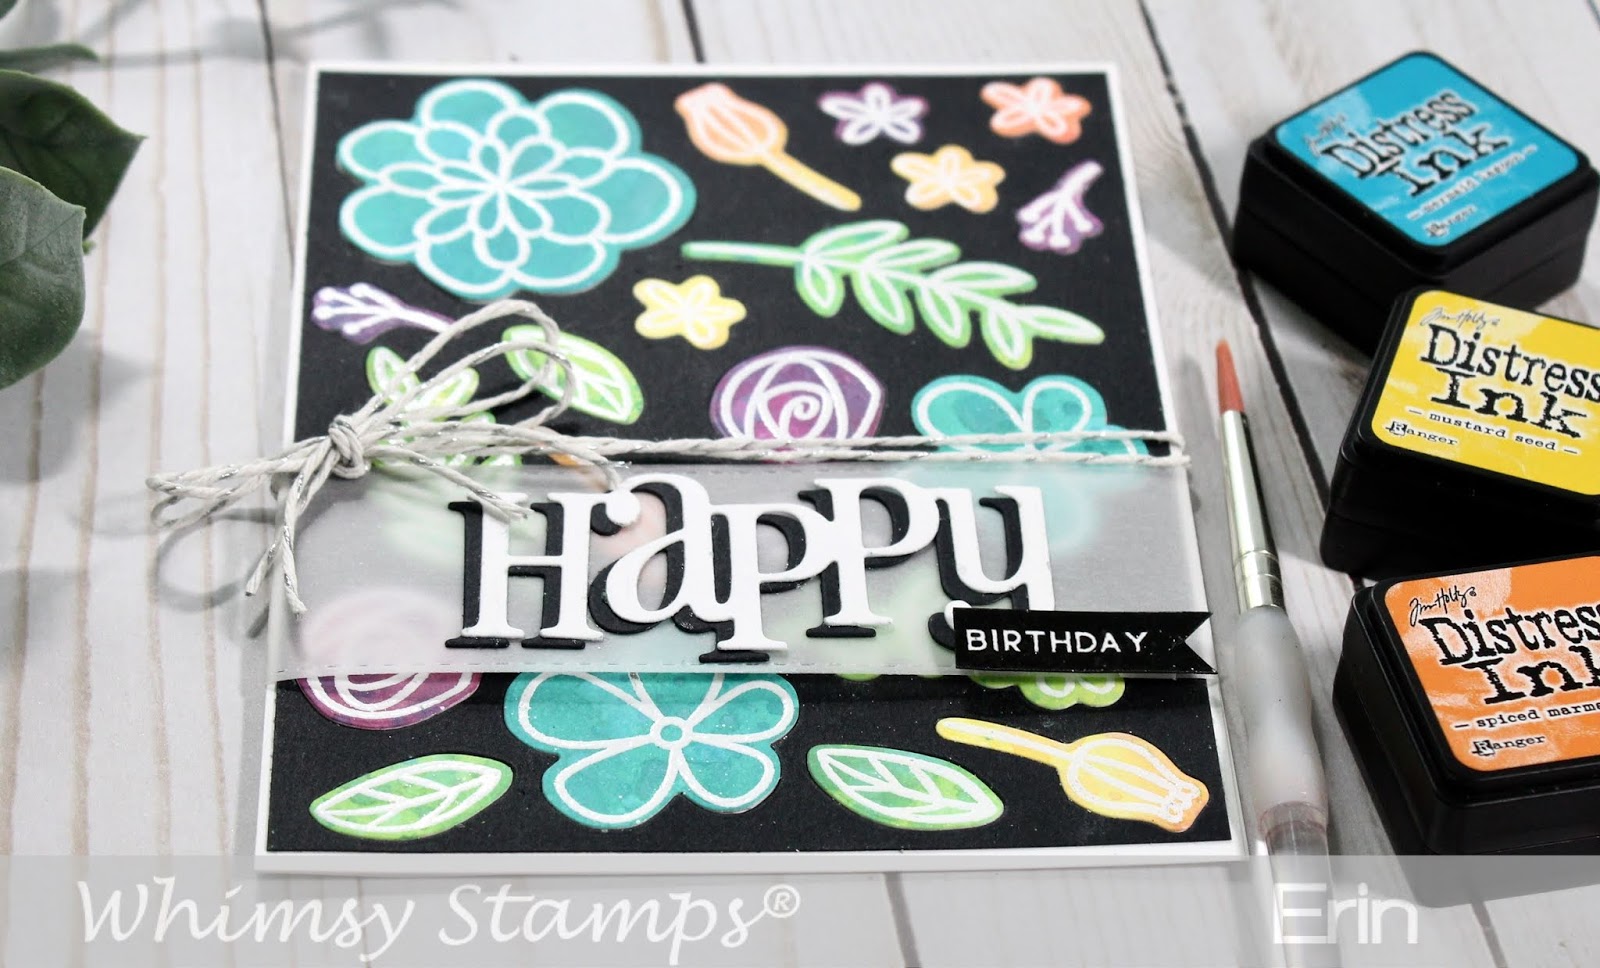
Hi Everyone, and welcome back! Today is my first official blog post for Whimsy Stamps, and I am so excited to share this inlaid die cut card using the July Paper Door kit stamps and dies, Beaucoup Bouquet. Have you ordered your kit yet?

Technique: Inlaid die cutting

I began by creating my flower and leaf background papers using Distress Oxide inks on Bristol smooth paper. First I “smooshed” the ink pads (two colors at a time for this project) onto the craft mat, spritzed with water until the ink pooled into drops, and blotted or pulled the paper through the wet ink. At times I spritzed the paper with more water to create a marbled effect. Then I dried it with the heat gun, and repeated the process a couple more times. TIP: The nice thing about Oxide inks is that they layer over previous colors, so you don’t get a “muddy” effect. Finally, I spritzed the paper with water, let it sit for a couple of seconds, dabbed it with a paper towel, and dried with a heat gun. I repeated until I was pleased with the outcome.

Distress Oxide inks used: Picked raspberry, seedless preserves, mermaid lagoon, cracked pistachio, squeezed lemonade, abandoned coral, lucky clover, and twisted citron.
TIP: Set your inked paper aside and die cut your background to insure that your paper is completely dry before embossing! The inking process is very wet, and the embossing powder will stick everywhere that the inked paper is not absolutely dry.

Can you see the "triangle" of flowers, and the visual balance of threes?
When designing a card layout, I usually stick to the tried-and-true composition rule of using odd numbers or groups of three, and you can see that in this background. I cut a piece of black cardstock to A2 size (5.5” x 4.24”), and began by die cutting one large flower in the upper left corner. Then I cut two smaller flowers forming a visual triangle (another design “rule” I use often). Can you see it? I worked from there to place the dies, and kept a small border around the edge. When the background was finished, I returned to my inked paper to emboss and cut the flowers.


Next I completely covered the inked paper with an anti-static tool to help insure I didn't get excess powder everywhere, and stamped all of the flower and leaf images with VersaMark then heat embossed. Finally, I die cut all of my pieces for my background, and glued them into place. TIP: I used my Tombow Mono eraser to remove some extra adhesive, ink, and “gunk” from the background panel. I found that all of the inking, taping, and glueing was messy, and the eraser helped clean up the final product to make it look clean and finished.

Finally, I trimmed the black background panel just a little to leave a white edge on the card. Then I finished it by adding a vellum strip, the die cut "Happy" sentiment with the "Birthday" banner, and a twine bow.


What do you think? I can't wait to see everything you create with this month's kit. Be sure to join and post your creations on the Whimsy Stamps and Inspiration Facebook page! Love and crafty hugs!

Erin


**PAPER DOOR - with USA shipping included**Distress Oxide Ink Pad - Seedless PreservesDistress Oxide Ink Pad - Cracked PistachioDistress Oxide Ink Pad - Picked RaspberryHappy Large Word DieVersaMark Full-Size Ink Pad - Original (Clear)

Fairy and her puppy

Hello Whimsy fans!

Are you guys doing ok? Having a good summer so far?
I am having a great summer, spending lots of time at my craftingtable :)

For todays card I have used the cute stamp Fairy and Puppy illustrated by Marina Fedotova for Whimsy Stamps.


My favourite colour medium right now is Distress Inks and that is what I have used on this stamp as well. I do hope you like the colours I picked for her.

Products I have used:

Fairy and PuppyHand Stitched Nested Rectangles

Thank you so much for stopping by today.

And don't forget to enjoy the summer.

Take care!
Hugs
Ellenor


Donut Birthdays

Good afternoon! It has been a while since I last posted on this blog, but I am excited to share a new project with you all today. I used the adorable Donut Birthdays stamp set with the matching sentiment as well.

*NEW Donut Birthdays

I cut out the circles slightly bigger than the donuts to look as if they were plates that the donuts were sitting on! And for the first time in many years, I used an old embossing folder to add a little texture to the card as I couldn't add all the layers I usually do! 


You can read more about this card on my blog post here. 

See you next time! 

Penguin Birthday - with Special Guest Michelle Short

Hello there, Michelle here and I am back with my second card as a guest for Whimsy Stamps. Today I am using the Penguin Birthday set, as well as the Everyday MiniSentiments set. Whimsy Stamps has lots of cute penguins for nearly every occasion anytime of the year...not just for the winter holidays.


I started off by stamping the penguin on to a piece of white cardstock that was cut using a stitched rectangle die. I then stamped the ‘happy birthday’ sentiment at the top, from the Everyday Mini Sentiments set. The panel was coloured using Copic Markers. It is a little difficult to see in the photos but I added colourless blender dots to the background to help with the birthday celebration theme.


The image panel was simply adhered to a white A2 card base with foam tape and then I added some shimmer to the present ribbon, hat and balloon with Wink of Stella. I also added Crystal Glaze to the balloon. Thanks so much for visiting the Whimsy Stamps Blog today and a big thank you goes to Denise, Deb and the team for having me guest with them. Have a great day!

Be sure to visit Michelle at:
Instagram: @thecardgrotto


Everyday Mini Sentiments  Penguin Birthday  

31 Nights of Halloween Night 28

Image may contain: text

Hello!

I hope you're enjoying our 31 nights of Halloween spooktacular! We're almost to the witching hour, just 3 more days to go. 
Now when you look at my 'Halloween' card, you'll see that it actually has a birthday sentiment on it. This is because in the UK we don't really send Halloween cards and our Halloween celebrations are really not so spectacular as over in the USA. 
However, people DO have birthday's on or around the Halloween celebration, so this still counts as a Halloween card right? 


I really wanted to give my card a fab spooky background, so I used my Distress Oxide inks to blend a moody night sky lit by the moon's glow, masking the moon and then colouring in later with a mix of Distress Oxide ink and a couple of grey toned Zig markers.

I coloured my vampire to coordinate with my background, with Zig markers and cut him out with the matching die. I die-cut the rest of my elements from black card stock, heat embossing my sentiment in white on top of my large gravestone and assembled my card. 

I added a little ink and some Wink of Stella to some of my elements to give them a glow and sparkle, and added some dots of white pen and glitter pen to my sky to look like stars.

I mounted my panel onto a plain black card base and just like magic (black of course) my card was complete.

I've added all the Whimsy products used below, with links to the items.

Dracula Bite MeDracula Bite Me Die SetDracula's Coffin Die Set

I have a prize to giveaway today, so for the chance to win  please visit my blog by following the link here and leave me a comment telling me what you usually do to celebrate Halloween. You have till the 30th October to enter, and the winners will all be announced here on the 31st.

Don't forget to keep checking back here every night for more Halloween fun and giveaways!