
Hello all and welcome to my Ticket Die Tutorial! Today I like to show you how fun and easy it is to use the new Whimsy Shapeology Ticket Die and alignment tool. I love this die! It's easy to use and makes a clear and perfect cut each time! The Whimsy Shapeology Dies work well in most leading brand die cutting machines and cut papers in various weights.

Ok lets get started:

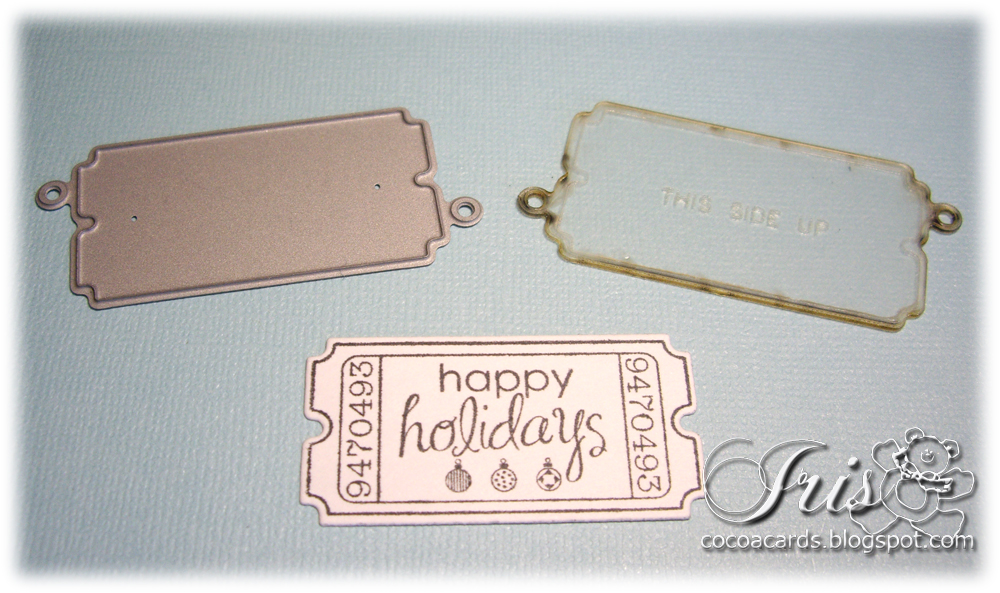
Gather your supplies! What you need is:
- the clear plastic alignment tool that came with the die
- a stamped ticket sentiment,
- a pencil and
- your die cutting machine.
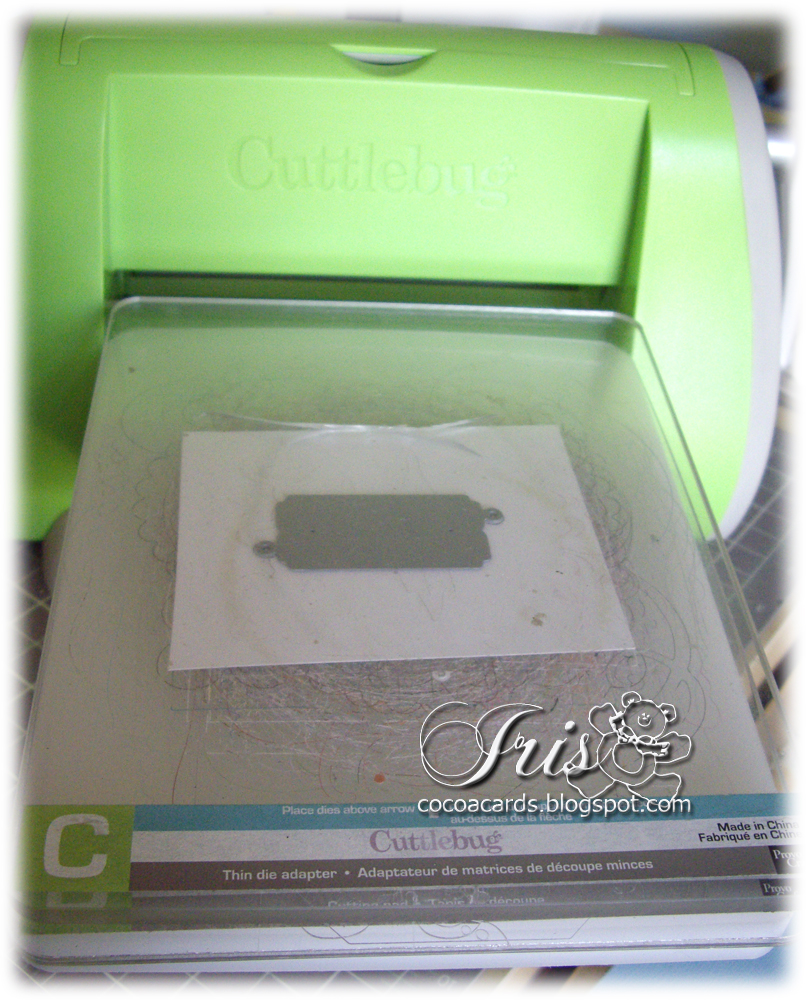
My tutorial shows how to use it with the Provocraft Cuttlebug.
My tutorial shows how to use it with the Provocraft Cuttlebug.

First stamp your ticket sentiment of choice onto cardstock. I used 'happy holidays',
one of the ticket sentiments from the Holiday Ticket Sentiments by Raindrop Echo Designs.
one of the ticket sentiments from the Holiday Ticket Sentiments by Raindrop Echo Designs.

Then take your die and plastic alignment tool ...

... and place it over your stamped image how you want it to be cut out. Make sure you
have the alignment tool with the correct side up (it is marked on the tool) otherwise your
pencil markings wont match with the die!
have the alignment tool with the correct side up (it is marked on the tool) otherwise your
pencil markings wont match with the die!

Now take your pencil and draw either around the little loops on
the sides or mark the wholes. For demonstration purposes I marked it both ways.
the sides or mark the wholes. For demonstration purposes I marked it both ways.

Remove the plastic alignment tool. This is how it looks now.

Place your stamped sentiment onto your cutting plate of your die cutting machine.
As I mentioned before I'm using the Cuttlebug. My Cuttlebug plate sandwich for cutting with
the ticket die is A, B, C and I'm cutting on plate B.
As I mentioned before I'm using the Cuttlebug. My Cuttlebug plate sandwich for cutting with
the ticket die is A, B, C and I'm cutting on plate B.

Now take your ticket die and place it, with the cutting edges facing down towards the paper,
over your sentiment. Make sure the metal loops align correctly with your pencil markings!
over your sentiment. Make sure the metal loops align correctly with your pencil markings!
Carefully put the C plate on top and try not to move the aligned die. Run it through the machine.

And voila! Your sentiment has been cut out perfectly!

Ready to use on your project!

That was easy wasn't it? I hope you enjoyed the tutorial and are having fun using your Ticket Die!
Thanks for stopping by the Whimsy blog today and have a fabulous weekend!
Hugs,


you made it look nice and simple, love your card x
ReplyDeleteThanks for the tute~~love to see how things actually work :)
ReplyDeleteHugs
Iris, this is such a brilliant tutorial hun!! Thanks so much for doing this! :)
ReplyDeleteIris I enjoyed your tut! I am really thinking I need this die..but I really think I need everything! LOL
ReplyDeleteOh Thanks for this tut i have just bought the die and the stamp set!
ReplyDeleteHi Iris, your timing is impeccable as I ordered the holiday sentiments and die last night. I'm saving this tutorial until I receive them. Thank you so much for explaining it so clearly. Hugs, Denise x
ReplyDeleteThanks for the fantastic tutorial, Iris! :)
ReplyDeletehugs, Vanja
Can't wait to get mine... hope it's in the mail!
ReplyDeleteThanks for this tutorial Iris. It was very helpful!
Love and hugs ~
Lori
Thanks so much for this tutorial! I just bought these stamps and die and I was totally confused by the clear bit lol Perhaps a tiny little note on the packaging to link to this tutorial might be a good idea? Otherwise fab product,thanks so much :o)
ReplyDeleteFiona x
Thank you so much for the tutorial, I recently purchased this die and didn't know how to align everything properly xxx
ReplyDeleteSame with me - I've been sitting here pondering how on earth to do this, fiddling with the die and piece of plastic! Thank goodness I found this tutorial before I began to lose sleep :) Di x
ReplyDeleteMe again! Just a thought, if you're worried about the die slipping away from the image as you layer the plate on top then try using some removable magic tape to hold the die in place on the card - I do that with Nesties if I'm die cutting round an image and am sure it would help here........or am I just a bit clumsy :) Di x
ReplyDeleteOoo, thank you so much for this, I wondered what the clear bit was for, d'oh, many thanks, this'll be so useful xxsue
ReplyDeleteThanks for a great tutorial! The ticket cuts out perfectly and I'm glad I didn't discard the little plastic piece!
ReplyDeleteI'm just seeing this tutorial. Looks easy. As soon as I get the die and stamps, will be ready to do it. Thanks. Edna
ReplyDeleteThank you, thank you, thank you!!!! I just got this in the mail today and I was trying to line it up to stamp it after I die cut the ticket! This makes perfect sense I truly appreciate you posting it!!
ReplyDeletehugs!!!
Sharon
THANK-YOU! I just bought the pennants set and the stamp set, and couldn't work out what I was supposed to do with the alignment tool :) x
ReplyDeleteThank you for a very clear and simply tutorial, very useful. Now I can play with my new stamps and dies :)
ReplyDeleteHugs
Suzi
xxx
Great!now i know what im doin!thanks.Gill
ReplyDeleteSo helpful!! Thanks a bunch!
ReplyDeleteSarah :o)
Thank you so much for this tutorial. I bought the mini stamp die and sentiments and couldn't fathom out what to do to line them up - tried using die first them stamping with dreadful results and just couldn't work out how to use alignment sheet. You make it so clear and obvious! Thank you!!!
ReplyDeleteAhhhhh.... Now I get it! tons of help!! Thank u
ReplyDeleteOh just what I needed. I really have been wondering how to use the alignment tool and then it is so easy. LOL. Thanks
ReplyDeleteWOW I love this tutorial! Now I know what to do!! Thank you sooo much!
ReplyDeleteHugs, Tammy