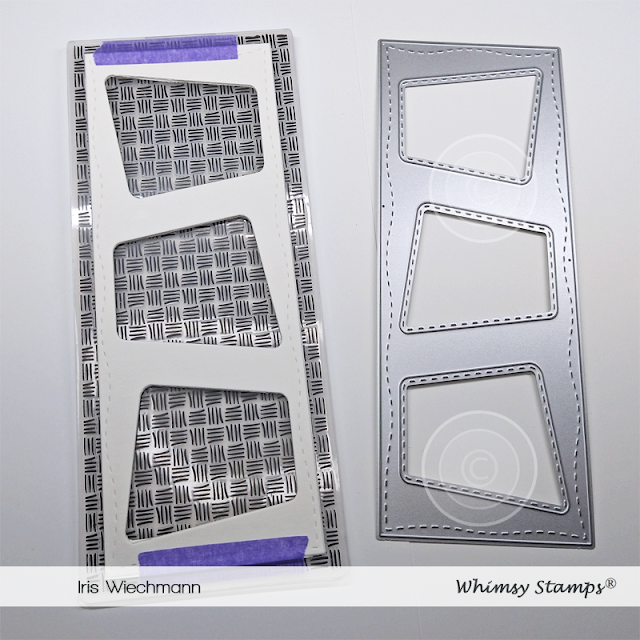
Hello Whimsy Friends it's Iris here today and Welcome to Tutorial Tuesday here on the Whimsy blog. I will be showing you a partial embossing technique using our NEW Slimline Embossing Folder Thatched with a self-made embossing frame using the Slimeline Marquee Die.
Here is what you'll need to create this card:
Slimline Thatched embossing folder
Best Best clear stamp set
Layered Dahlia clear stamp set
Slimline Marquee die
Slimline card base, topfold in black 3.5" x 8.5"
Orange cardstock layer 3.25" x 8.25"
White cardstock 3.5" x 8.5"
2-4 cardboard panels 3.5" x 8.5"
Scrap pieces of black cardstock for sentiments
2 different colors of orange ink (light and darker)
2 different colors of green ink (light and darker)
White ink pad, white gel pen, stamp positioning tool,
glue, foam tape, purple tape, masking paper, alcohol or water spritzer,
die cutting machine, paper cutter, scissors, stylus, wax paper,
foam pad or mouse pad, a few clear sequins or confetti
Here is how to create this card:
Depending on the thickness of your cardboard you will need about 2-4 Marquee frames. The completed frame should be about 1/16". This is not a set value just my experience. It also depends a lot on your machine and the pressure it applies. You might need to do several test runs until you are satisfied with your result. You might need more or less frame layers. In my case I used heavy weight 140lb watercolor paper and layered 4 frames on top of each other. I am using a Vagabond die cutting machine.

Take your piece of white cardstock and spritz it slightly with water or alcohol to make it more pliable. This will prevent the paper from cracking while embossing, especially with thicker paper/cardstock. It also gives a better embossing result that is more clear and crisp. But be careful not to wet it too much then it has a reverse effect and might rip easily.
Put your cardstock centered in the embossing folder like you normally would. Depending on your die cutting machine you have to figure out what the best sandwich will be. Like I mentioned above I am using a Sizzix Vagabond machine. I put my embossing folder and frame directly on top of my extended multipurpose platform - NO cutting plate underneath! - with both tabs closed. Meaning in my case it sits right on top of tab 2. Then I place a cutting plate on top. (You might have the same sandwich if you are using a Big Shot). Now run it through your machine.
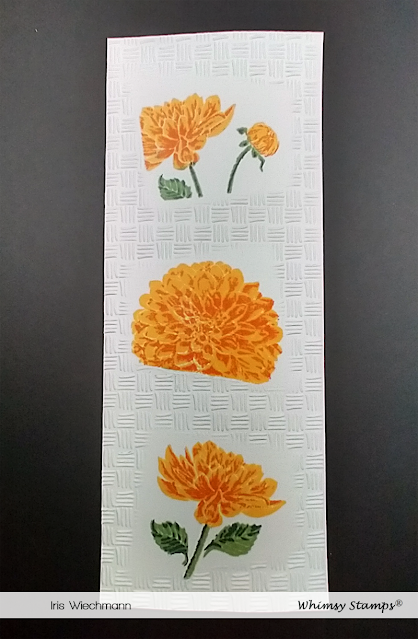
Here is the result. Our cardstock is nicely embossed leaving the areas where the windows in our frame were nice and smooth.
Tip: If you want to make the unembossed areas stand out even more you can do this little trick. Using a piece of wax paper rub slightly over the unembossed areas. Put the cardstock on top of a foam pad and with a ball stylus and the help of the embossing frame trace around the outline of the windows. This makes the windows more pronounced.
I stamped my windows using the Layered Dahlia clear stamp set by Crissy Armstrong. I recommend using masking tape while stamping to avoid getting ink on the embossed areas. I used two different tones of orange ink for the blossoms and two different greens for the stem and leaves.
When you are done stamping the flowers trim your embossed cardstock to size (3" x 8")
I used words from the Best Best clear stamp set to create my sentiment strips.
I stamped with white ink (Hero Arts Unicorn) onto black cardstock.
Tip: Often when you stamp with white ink onto dark cardstock the coverage is not perfect. Even if you are using a stamp positioning tool and stamp the sentiment repeatedly. I find that it never really comes out perfectly with the white ink (no matter what white ink I am using). If that happens I'll take my white Gelly Roll 10 pen and slightly trace the letters. It makes my sentiment look perfect. I highly recommend the Gelly Roll 10 as it is slightly thicker than the regular Gelly Roll pen and the ink comes out very smooth. It's also important not to apply pressure and work slowly as you do this.
Ok, so now it's time to assemble and decorate our card. I glued the embossed layer on top of the orange cardstock and then adhered both with foam tape to the black card base. I then added the sentiment strips with foam dots. A few clear confetti sequins finish off our card.


This is beautiful Iris and a really clever technique! Thank you so much for sharing this great idea!
ReplyDeleteLove from Sue...xxx
Thank you Sue! xx
DeleteBeautiful card Iris....thanks for taking the time to teach is with a tutorial, much appreciated
ReplyDeleteThank you Michelle. Happy to hear you like the tutorial. Let me know how it went if you give it a try.xx
DeleteNice post. Making cards and folders with embossing process and embossing powder look more attractive. We offer embossing dies and metal stamps for you. contact us for details
ReplyDelete