
Hello!
Today I'm going to share with you my paper flower tutorial. It's simple, but I think the flowers look nice and effective.
You can see the flower in the card below.

(I posted this card here on the Whimsy Inspirations blog on Friday, but as I made the tutorial along with this card, I’m posting it again. )
The image is Trimming the Tree, designed by Crissy Armstrong; the sentiment is from theTrimming the Tree sentiment set designed by Ann Vento.
And now, the tutorial - I will try to explain it step by step, but I think the photos show it well enough, too. It will be photos first and then a short explanation. :)

All you need for this flower is a piece of cardstock, or paper in any colour you wish, distress ink pad, I prefer Vintage Photo, a brad and a pen.

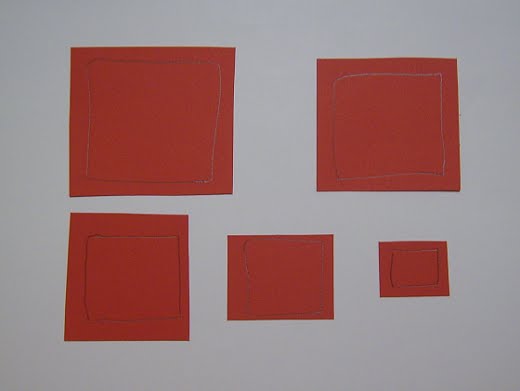
First step is to draw rectangles, yes rectangles, not circles. I always draw five of them, I start from the biggest one and go to the smallest, last one.

Next step is to tear the paper rectangles like in the photo, make sure you tear close to the line you drew.

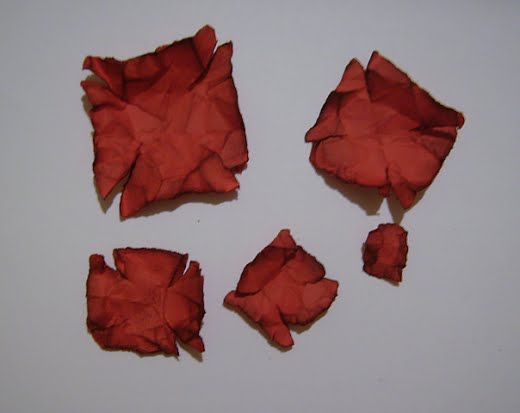
Now you take each rectangle, one by one and fold it in the middle like in the photo, to get a triangle and after you've done that, you just tear it from the top, but just a little, not to the bottom line.

Then you unfold it and fold it again using two other corners of the rectangle tearing them in the same way. You repeat that with every rectangle.

When you're done with that, this is what you should get.

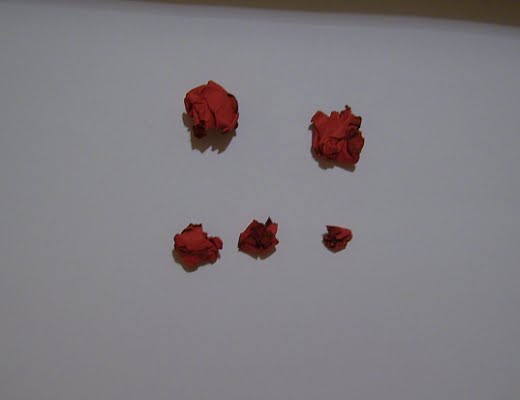
Now just crumple all five rectangles like in the photo.

Uncrumple them and use your distress ink pad to distress all of them. Make sure you distress well all the edges and you can distress the surface, too.

And this is what you should get (the photo above)

Now crumple all the rectangles again and uncrumple them. You can repeat it for the third time, too.

Put rectangles one over the other, starting with the biggest one, the smallest one should be on top. Just make sure that torn parts of one rectangle don’t go over the torn parts of the other rectangle.

Put a brad in the centre of the rectangles.

Now it's time to make a pretty flower out of the thing you got.
I must say that I always attach flower to my card first and then start arranging it, it's much easier that way.
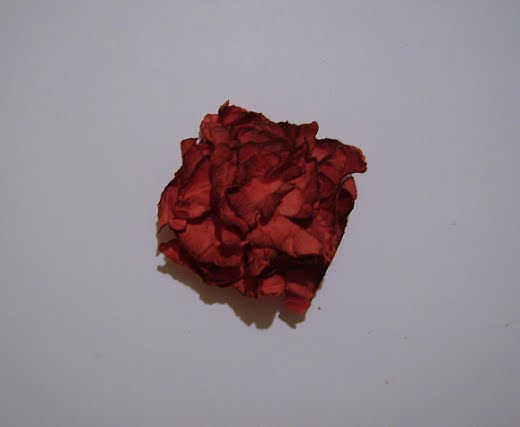
First, crumple it a little, move some of the parts of the flower forward so it doesn't look flat and then start rolling the torn edges like in the photo. It really doesn't matter if you roll one side on the inside and another one on the outside, for me it looks prettier when it's kind of messy.

And this is what you should get at the end!
I hope you liked my tutorial, let me know what you think and also if you have some questions, suggestions or corrections, don't hesitate to speak. :)
You can find the image and the sentiment I used on this card and also many other beautiful images and sentiments in the Whimsy Stamps Store.
Thank you for reading this tutorial and have a great day!
Today I'm going to share with you my paper flower tutorial. It's simple, but I think the flowers look nice and effective.
You can see the flower in the card below.

(I posted this card here on the Whimsy Inspirations blog on Friday, but as I made the tutorial along with this card, I’m posting it again. )
The image is Trimming the Tree, designed by Crissy Armstrong; the sentiment is from theTrimming the Tree sentiment set designed by Ann Vento.
And now, the tutorial - I will try to explain it step by step, but I think the photos show it well enough, too. It will be photos first and then a short explanation. :)

All you need for this flower is a piece of cardstock, or paper in any colour you wish, distress ink pad, I prefer Vintage Photo, a brad and a pen.
First step is to draw rectangles, yes rectangles, not circles. I always draw five of them, I start from the biggest one and go to the smallest, last one.

Next step is to tear the paper rectangles like in the photo, make sure you tear close to the line you drew.

Now you take each rectangle, one by one and fold it in the middle like in the photo, to get a triangle and after you've done that, you just tear it from the top, but just a little, not to the bottom line.

Then you unfold it and fold it again using two other corners of the rectangle tearing them in the same way. You repeat that with every rectangle.

When you're done with that, this is what you should get.

Now just crumple all five rectangles like in the photo.

Uncrumple them and use your distress ink pad to distress all of them. Make sure you distress well all the edges and you can distress the surface, too.
And this is what you should get (the photo above)
Now crumple all the rectangles again and uncrumple them. You can repeat it for the third time, too.
Put rectangles one over the other, starting with the biggest one, the smallest one should be on top. Just make sure that torn parts of one rectangle don’t go over the torn parts of the other rectangle.

Put a brad in the centre of the rectangles.

Now it's time to make a pretty flower out of the thing you got.
I must say that I always attach flower to my card first and then start arranging it, it's much easier that way.
First, crumple it a little, move some of the parts of the flower forward so it doesn't look flat and then start rolling the torn edges like in the photo. It really doesn't matter if you roll one side on the inside and another one on the outside, for me it looks prettier when it's kind of messy.

And this is what you should get at the end!
I hope you liked my tutorial, let me know what you think and also if you have some questions, suggestions or corrections, don't hesitate to speak. :)
You can find the image and the sentiment I used on this card and also many other beautiful images and sentiments in the Whimsy Stamps Store.
Thank you for reading this tutorial and have a great day!
Hugs,
Vanja


Hello Vanja,
ReplyDeletethanks for sharing this great tutorial with us. Your handmade flower just rocks!
Hug,
Lins x
Awesome, Venja! I am never happy with my homeade flowers but I am going to give this a try. :-)
ReplyDeleteBeautiful flower Vanja and a fabulous tutorial! Thank you so much for sharing it with us! :)
ReplyDeleteWowzers this is absolutely fantastic Vanja, whoever would have thought that from a few squares you could get such an amazing result! I'm inspired!!
ReplyDeleteBeautiful flower Vanja!! Thanks for sharing xxMarley
ReplyDeleteWhat a neat technique and beautiful result! Thanks for sharing this Vanja! :)
ReplyDeleteThanks for sharing the tutorial. I love the way it turned out.
ReplyDeleteWhat a fabulous flower and tutorial, Vanja! Thank you so much for sharing this! Hugs, Simonne x
ReplyDeleteJust a quick note to let you know that a link to this post will be placed on CraftCrave today [14 Jul 12:00pm GMT]. Thanks, Maria
ReplyDeleteWow! What an awesome tutorial--off to give it a try!
ReplyDeleteThank you! This is such a clear tutorial. I've wanted to make flowers like this for some time and never knew how! Thank you very much!
ReplyDeleteSo fun and easy, thanks!
ReplyDeleteThe flowers are beautiful Vanja!! I will have to try your tutorial!! TFS! Great job with the pictures and instructions!
ReplyDeleteThis is a fabulous tutorial Vanja I can't wait to try it out.
ReplyDeleteHugs
Lorraine x