Showing posts with label Slimline Hourglass Die. Show all posts

31 Nights of Halloween Night 31 - Hourglass and Winners Announced!


HAPPY HALLOWEEEEEN! 
It's my favorite day of the year, and I'm excited to announce all of the winners from our 31 Nights of Halloween event!
 THANK YOU to all our awesome customers who entered, shared, and participated in our spooktacular festivities. 

And what better day to share with my fellow Halloweeners one of my favorite cards.
 Keep reading to the end for a link to all the winners from our 31 Nights of Halloween Give-a-ways!


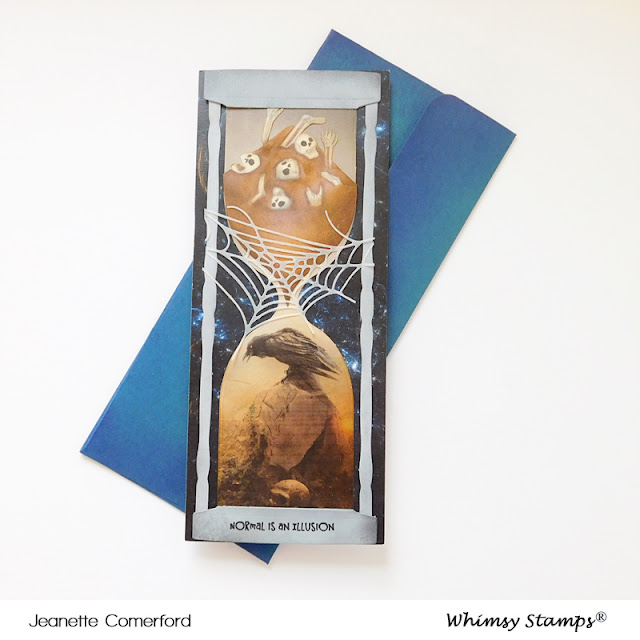
This card came together super easy using the slimline SurREALLY Cool Halloween papers, and the killer cool new slimline Hourglass die


I trimmed the (girl) SurReally Cool Halloween paper down to 2.75 x 8.25 and added it to a black card base. Prepping for my shaker card, I trimmed the sunburst paper down to 3.25 x 8.25 and used the slimline Hourglass die to cut out the hour glass shape from the center. Then added clear acetate to the back and then foam tape all the way around the hourglass shaped opening, making sure there were no gaps/openings that would allow any shaker pieces to escape.


I die cut the black spindles, the hourglass topper, and the hourglass base pieces twice each and glued the matching pieces together to make them each two layers thick. I like the stability and dimension of stacking dies and I typically do that with all my die cut pieces often even more than two layers.

 Once I had them stacked I added some foam tape to the back of all the pieces (except the two feet). For the two feet I just kept those a single piece each because I didn't need the dimension for those.  

(*I fully assembled the hourglass before adding it to the card front.)


On the card base I added the Sprinkletz shaker pieces that I wanted toward the bottom of the girl, then placed the foam backed sunburst hourglass piece on top. Then carefully placed the fully assembled black hourglass to the front. 

My final step was to add the black feet using tweezers to easily tuck them underneath the base. 

This is just one of the many ways to assemble/use the Slimline Hourglass die, there are so many cool options for this die, I hope you find it as fun and easy as I do. And I hope you have a HAPPY HALLOWEEN! Until next year my friends...Mwaaaahahahaaa!

THANK YOU to EVERYONE who participated and who shared their WONDERFUL Halloween Whimsy Stamps creations on the blog and across social media, we enjoyed every single one of them and we hope you're already looking forward to next years party!!

The GRAND PRIZE WINNER of a $100 Whimsy Stamps shopping spree is...
Waleska Galindo
CONGRATULATIONS Waleska, you have until November 7, 2021 to claim your prize by emailing WhimsyStamps@gmail.com

$25 Whimsy weekly winners have all been sent gift certificate confirmations via email, there's no need to claim your prize.

CONGRATULATIONS to:

Week 1 - Sylvia Riet & Monica Ornelas
Week 2- Mari Campbell & Londa Beebe
Week 3 - Melanie Tong & Heather Armstrong
Week 4 - Anne Trouw & Debra McGill


 Thanks for stopping by...see you soon,


31 Nights of Halloween - Night 19


Hello friends! It's Michele here with another fun Halloween card to share! I absolutely love, love, love this Slimline Hourglass Die! It is the perfect backdrop for all of your spooky Halloween goodness! The "Glass" was cut out with vellum.  I cut the "sand" using orange card stock and used the Halloween Expressions Stencil to fill it in.  I added spiders and webs from Whimsy's new die set.  I applied crackle paste over my spider and let it do its magic.  Once dry, I rubbed black ink over it.  


I added the EEK! Word and Shadow Die and a few spider sequins, from the Sparkletz-Creepy collection,  to finish off the card. 


Thank you so much for stopping by on Day 19!


31 Nights of Halloween - Night 14


Happy Thursday Crafty Friends! This is Jeanette and it is my turn to share a spooky project with you.  This is such a fun event - full of fun and inspiring projects and with some spooktacular prizes to boot!


For my card, I created a Slimline card that measures 3.5" x 8.75".  I adhered one of the papers from the Nebula Slimline Paper Pack to serve as the background.  I made sure to choose a paper with a color palette that contrasted with what I was going to choose to put in my hourglass.

For the hourglass, I used one of the papers from the Nevermore 6x6 Paper Pack and the die in the Slimline Hourglass Die Set.  Making sure that the crow was well centered, I die cut it using the bottom portion of the Slimline Hourglass Die.  Then I cut the leftover paper using the upper portion of the die.  My leftover paper didn't completely fill in the upper portion but that is okay since I was going to be covering it up!  Just make sure that the upper part is fully there!

To create the top, base and sides, I used the corresponding dies in the Hourglass die set and cut them all out of grey cardstock.  I then blended on Distress Inks in Weathered Wood and Black Soot to give some dimension.  I used one of the sentiments in the Morticia Clear Stamp Set and stamped it with Versafine Black Onyx onto the base.


I then stamped the skulls using one of the stamps in the Scream Time Clear Stamp Set onto some white Neenah Solar Crest paper using some very light ink. I didn't want any of the lines to show once my coloring was finished.

I used these Copic Markers:
0, W00, W1,W3, W7, E70, E71, E74, E77

Once I had finished coloring, I blended on some Brushed Corduroy ink onto it so that it would better match the bottom portion of the hourglass with the patterned paper.  I then cut out the top portion with scissors and then used the die in the hourglass set to die cut out the bottom portion.  It took a little finessing but it really is worth it for the final look!

I die cut one of the webs in the Spiders & Webs Die set out of vellum and then I adhered all these elements into place onto my card.

I used some dark blue cardstock and the Slimline Envelope Builder Die Set to create a coordinating envelope.  I sponged the edges with some Wilted Violet Distress ink.

Supplies:

Thanks so much for stopping by today.  I had a lot of fun creating this card and I hope it inspires you to create your own spooky hourglass card!


Hugs Jeanette xxo