Oh What Fun Merry Moosemas - special guest - Rachel Alvarado

Hello everyone!  I'm back with my final guest post this month for Whimsy Stamps.  I have had a fun time using their fabulous products and I am so grateful to Whimsy Stamps for this wonderful opportunity!  You can check out the variety of amazing stamps and dies that they have available HEREAffiliate links used.


I actually created two projects to share with you today.  When I first saw the Merry Moose-mas Rubber Cling Stamp, I was itching to color it, lol.  He's just the cutest!  This is a single-layer card, stamped with Black Ink onto a piece of Neenah Solar White 110lb Card Stock and colored with Copics.

Whimsy Stamps


After I colored my image, I diecut the entire image with the largest of the Hand Stitched Nested Rectangle Dies.  I then stamped my sentiment (from the Bundled Up Clear Stamp Set) with Black Ink and then adhered this entire panel to a vertical, top-folding A2 sized card base.


Copic Colors Used:


Lastly, I added some snow on top of both the sky and the moose with a White Gel Pen.

Merry Moose-mas
Whimsy Stamps Merry Moose-mas Rubber Cling Stamp


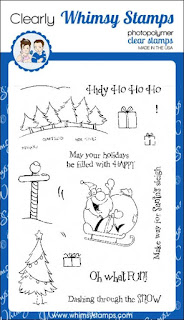
For my second project, I used the fun and festive Santa from the Oh What Fun Clear Stamp Set.  I love how Santa already looks like he's cruising along.  To give him some more movement, I created a hidden reverse-slider panel.


When you pull on the tab, Santa goes flying across the snow to go deliver his bag full of goodies! (I've included a short video at the end of this post to show how Santa moves across the snow).


To create this type of a card, you only need a craft knife (or slot punch), a ruler, a plastic bag, 3D foam tape and some 1.4" tape runner.  I apologize that I didn't create a video for this process but if you google "Creating a Card with a Hidden Slider Channel", you will find a lot of good tutorials out there!  The fun part is that you can use this technique on so many of the Whimsy Stamps that you already own! OR you can makes things even easier and check out the new line of kinetic dies that Whimsy has just introduced this month...see them all HERE.


For the sky, I blended some Distress Inks (Faded Jeans and Tumbled Glass) and then added some snow using some Opaque Crackle Texture Paste and the Polka Dots Stencil.  I also added a few more dots of snow with a White Gel Pen.  I used the Stitched Border Die Trio for the snowy hill.


Oh What Fun

I hope you enjoyed my cards today!  Here are the rest of the cards (below) that I created this past month for my Whimsy Stamps Guest Design Posts.

https://theunpamperedstamper.blogspot.com/

Thank you all so much for dropping by!  If you liked this card and want some more crafty inspiration, don't forget to check out my INSTAGRAM feed!

Wishing you all the most wonderful day!

♥ Rachel


~ Jingle all the Wave ~


Jingle wave, jingle wave, jingle all the wave....sounds like a good place to spend Christmas to me!  There's nothing like feeling the ocean breeze on your face and seeing nothing but ocean for miles to ponder, pray, dream, refresh and renew your heart and soul!!!


I love making cards with lots of dimension.  You can see the Rudolph Seahorse is on top of a Mini Action Wobble Spring (see pic below) so when you shake the card he wobbles, too.....so cute and fun!!!


~ Copics ~

Seahorse:  BG10 BG11 BG13 BG15 BG18 YG11 E50 E93
Jingle Bell:  Y11 Y15 Y19 YR24
Santa Hat:  R24 R27 R29 R89
Santa Trim:  C0 C1 C3 C5 
Cast Shadow:  BV20 BV23

Happy Stamping!

~ Nicolette ~


Seal on Ice

Hello all,
 
It is my turn again to show you an inspiration card.
I made this swing card with Seal on Ice
Digital stamp: Seal on Ice
coloured with copics
Paper: Christmas Azure
Below you will find the products I used with a link to the shop

I wish you all a merry Christmas 
May all the Joy of Christmas fill your heart thoughout the New Year
Till next time

Seal on Ice - Digital Stamp  Christmas Azure Papers - Digital Papers
 

CC Designs Candy

Hey there all you whimsy fans have you seen that Whimsy Stamps now has CC Design Digital Images in the store they are all so cute you will want them all.
Just pop on over to the store HERE 

The image I chose to work with is called Candy I have made her into a shaker card I have had a lot of fun making shaker cards this year 


I have also used the wonderful dies from Whimsy Stamps I am in love with them I have used the Shaker Maker 


https://whimsystamps.com/collections/shaker-maker-dies/products/shaker-maker-combo-die-set?aff=21https://whimsystamps.com/collections/november-2018-digital/products/candy-digital-stamp?aff=21https://whimsystamps.com/collections/word-and-alphabet-dies/products/christmas-large-word-die?aff=21

Thank you for stopping by 


White Christmas

Hello Everyone!
Today I have a pretty CAS (Clean and Simple) card to show you!
I started with white and red mirror cardstock (the hardest to photograph!), along with some basic die cut shapes, and one of the trees from the Evergreen Trees Die Set. I stamped my sentiment from Bundled Up in VersaFine Clair Nocturne ink.
I stamped one of the snowflakes from Bundled Up in VersaMark, and then embossed with Clear powder
I then assembled the card, popping up the circle with 3D Foam Circles, and adding a few Snow White pearls for bling.
Super elegant and super easy! Plus - it's flat enough to mail without extra postage, and that's always a plus!
Hope your November was full of blessings!

Elsa the Fairy - special guest - Kathy Tanner

Hi it's Kathy and I'm back with another Christmas card for Whimsy Stamps :)

I love Marina Fedotova's girl stamps!
There are so many gorgeous ones that it was hard to choose just one but I ended up falling for Elsa the Fairy.
It is such a beautiful image and I really loved colouring her.


After I coloured her with Copics I used the Envelope Edger Die to create a pretty border.
I love the effect this edge gives!

I placed this over the top of another piece of white card that I had stamped with the Gingham Background stamp  This background is so versatile, but I especially love teaming gingham with sweet images such as this one.

I stamped the "Christmas" from Everyday Scripted Sentiments in a darker ink over the top of the background.  And paired it with the Happy Large Word Die.

I used this technique on one of my other Christmas cards too but I couldn't resist doing it again!
I just love the way these two work together!

I finished the card off with an enamel dot from the It's a Party collection and a little Wink of Stella on the star.

Copics used :

R 20, 22, 24, 30
BV 0000, 000, 00, 02, 04
BG 000, 01, 02, 05, 09, 10
YG 01, 13, 17
Y 11, 13, 28
YR 16
E 000, 00,13, 21, 41, 42, 43, 44
W 00, 1


Thanks for dropping by today :)

Kathy


An Ink Blended Christmas Eve

Hello! Niki here, and I just have to tell you that I love the Dash Away Stamp Set from this month's release! It’s so versatile – the sheer number of cards you can make with this set is fantastic. Of course, the first thing I did with it was to create a Distress Ink blended Christmas Eve scene.


I couldn’t resist. The little silhouette stamps are perfect, don’t you think?

The first thing I did was cut my card front pieces: one 4″ x 5-1/4″ rectangle of Neenah Solar White, and the snowy hill section, which measures 5-1/4″ long by about 1-1/4″ at the low point. I used Royal Sundance Felt Cardstock for that piece since it has a snowy-looking texture.

To figure out where I needed to start with the blending, I drew a light pencil line where I planned to put the hill.


Next, I blended my ink color in from the sides starting with the lightest, Scattered Straw, then moving on to Seedless Preserves and finally to Chipped Sapphire at the top.


It took a few layers of color to get the blend I was looking for but when it was done, I let it dry just a little bit.  Then, I added a few flicks of water with my paintbrush to make the beginning of a snowfall.


I re-drew my pencil line at this point and aligned all my stamps in a Mini MISTI. I stamped the images with Versafine CLAIR in Nocturne. You know, if you make a bunch of backgrounds first, you can mass produce these cards!


Then, I adhered my snowy hill over the bottom of the inked panel and attached the card front to an A2 card base. And to finish up, I drew some tiny stars with a Silver Star GellyRoll Pen.


Thanks for reading today! Check back tomorrow for more crafty goodness!


Angel Wishes

I sound like a broken record buuuuut, I really do adore the images by Marina Fedotova that Whimsy Stamps does.  Today’s card features Angel Wishes, you get a double dose of sweetness with this one.
I used the fabulous Notched Squares Die Set for the card shape.  They really add the wow factor to a square card.


bev-rochester-whimsy-stamps-angel-wishes
   

I made a simple poinsettia from foamiran and the Lily Flower Die Set.  The little blue flowers are also foamiran, I used an old blossom punch for these and glued 4 layers together before filling the centres with a whole bunch of platinum coloured stamens (I painted the stamens to get the colour I wanted).  I die cut some platinum glitter holly leaves and white mistletoe leaves from the Christmas Branches die set and finished off with some distressed organza ribbon and some wee polystyrene snowballs.


bev-rochester-whimsy-stamps-angel-wishes4


I finished off with a sentiment from my all time favourite Christmas sentiment stamp set – Holiday Mini Sentiments.  They just have every sentiment I could ever need and in the most perfect size too.  I don’t often make blue cards but I love how this one turned out.


bev-rochester-whimsy-stamps-angel-wishes2


Products used from Whimsy Stamps:


Angel_Wishes_COlor_display_1024x1024 holiday_mini_sentiments_online_1024x1024 notched square die set display Lily_Flower_Die_Set_large Christmas_Branch_die_set_display_large
 001_white_409779bf-8977-4109-821b-5bdf94435657_1024x1024 foamiran shaping tools Copic-Markers-1024x843 glamor-dust