Showing posts with label Copic Markers. Show all posts

Special Guest - Julee Tilman

Hello, Whimsy friends!
Today we welcome the lovely Julee Tilman back to the blog.
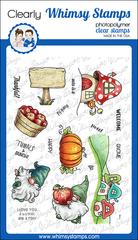
Hi crafty friends! I'm super excited to be back for another post as a Special Guest at Whimsy Stamps. I'm a huge fan of their adorable gnomes, so I just had to play with the Gnome For the Holidays and Gnome for Christmas stamp sets.


I started by coloring up the Santa hat and Christmas lights gnomes from Gnome for the Holidays with Copic colors in a traditional Christmas color combo.  I then die cut them with the coordinating Gnome for the Holidays Outline Dies, die cutting the Santa one a couple more times to layer up for dimension.


I grabbed some designer paper scraps from my Christmas stash and went to work creating some simple layouts for these sweet little gnomes. I'm usually a more is more girl, but I try to keep Christmas cards pretty tame so they don't cost a fortune to mail! Santa got a buffalo plaid print to ground him, then the sentiment stamped on a die cut circle up above. I accented with sequins and rhinestones to finish off this sweet card.


For the Christmas lights gnome, I decided to make a mini slimline card with a gift card pocket. I created some easy layers and a pocket that would fit a mini Starbucks gift card, then added the darling gnome to the front of it. The sentiment is from the Gnome for Christmas set, and I stamped it onto a die cut  from the fabulous Antique ATC Frames Die Set. My finished card size is 3.5 x 6".


My final card for today uses the adorable elf gnome from Gnome for Christmas. I die cut him with the coordinating Gnome for Christmas Outline Dies, cutting a few more die cuts two layer up for dimension.  Next I used the Antique ATC Frames Die Set to cut a sentiment panel from white cardstock and a mat from patterned paper.  I used the Twinkle Stencil with a light green ink to add a little interest to the sentiment panel, then embossed the holly jolly sentiment in a darker green ink. A few layers of paper and some rhinestones and this card was finished.


Thank you for stopping by today! I am so honored to have been a special guest and it was such a treat creating with all their wonderful products. If you love gnomes as much as I do, you don't want to miss their brand new Gnome Warm Wishes stamp set. It's the next thing on my gigantic wishlist!

Thank you, Julee, for this adorable inspiration!
To see more of her work, please check out her blog and Instagram account.

Special Guest - Julee Tilman


Happy Thursday, Whimsy friends!
Today we welcome the lovely Julee Tilman to the blog!

Hi crafty friends! I'm super excited to be a Special Guest at Whimsy Stamps this month. They have so many wonderful stamps and dies and I have had so much fun creating with them! November is one of those months where I kind of naturally flip back and forth between autumn and Christmas in my creating, so today I'm going to focus on fall cards and I'll bring you some winter inspiration in my next guest post.

Gnomes and coffee are two of my favorite things in the stamp world right now. So for today's cards I chose to use the Gnome So Thankful and Pumpkin Spice Pandas sets.


These little gnomes make me smile, so for my first card I decided to create a scene card with the mushroom house, sign, apple barrel, and leaning gnome images in Gnome So Thankful.  I started by stamping the mushroom house on a panel of cardstock, then free handing a little path coming from the door and extending the hill line as needed with a black detail pen. When this was finished, I colored in the trail with Copic markers and then stamped and colored the other images and fussy cut to determine placement. Once I decided how to lay them out, I masked off the hill area and the house and blended the autumn sky with candied apple, spiced marmalade, and  fossilized amber distress inks. To finish off, I colored in the grassy hill and added a few little details with Copic markers.  

To put it all together, I layered the gnome on top of the sign, then stamped the welcome and gnome sentiments. Then it was a matter of gluing down my additional images and popping up the gnome and  sign he's laying on with dimensional tape. I finished off with some glossy accents on the apples.


I had so much fun ink blending on that card that  I decided to do another ink blended background for my background. This time I blended squeezed lemonade, mustard seed, crackling campfire, and ground espresso distress inks, then flicked a bit of water on just the ground espresso layer to give a little texture to the "dirt". I pulled the pumpkin image from the Gnome So Thankful set and stamped directly on my blended background, then again on cardstock. I colored the stamp and leaves and fussy cut just those parts, then layered onto the stamped image on my background.


The panda and cup are separate images from the Pumpkin Spice Pandas set. I didn't want a jack-o-lantern look, so I stamped the cup image a second time in no line coloring ink then colored in the pumpkin portion with Copics and fussy cut to piece on top of the cup image. Then I colored the sweet little pumpkin head panda and layered on top of the cup, covering up any lines from the panda on the other image.  I finished by popping up the panda and cup with foam tape and then adding the Everything Pumpkin Spice sentiment to the blended background.

Thanks so much for stopping by today! I hope you've enjoyed these autumn creations as much as I enjoyed creating them! I'll be back next week with a little Whimsy Stamps winter flair.

Thank you, Julee, for this adorable inspiration!
To see more of Julee's work, visit her on Instagram and her blog.

31 Nights of Halloween - Night 24 - Special Guest Kelly Wauters


Good evening, Whimsy friends!  
Tonight we welcome Kelly Wauters back to the blog for some fun inspiration.

Hi Whimsy fans

It's me again, Kelly W, with a second card for the 31 nights of Halloween. Halloween is right up the corner. Are you guys as excited as I am? 


This second card turned out so cool if you ask me! 

First I stamped Zombie Boy ,colored him with Copic Markers and I added his crazy eyes.


I always start with the main feature first, because I always make the colors from the main return in the background.


Then I created the background using texture paste and a bubble stencil. I painted that with green acrylic paint, and sprayed metallic paint over it to give it a cool shine.


I used the Atlas Mason Jar Die Set to create the Mason Jar and I filled it with some printed Brains. And overlapped it with Vellum paper for the glass effect.


Then I glued the Jar on the card, the Zombie on the Jar, the sentiments on the Zombie and Jar, and Zombie Boy comes to life. 


I really hope you guys love this card as much as I do, and I really hope I could inspire you.

Being a guest designer for Whimsy Stamps is a dream that came true, and I really enjoyed making these Halloween cards. 

Happy Halloween and stay creepy!


31 Nights of Halloween - Night 21 - Special Guest Rachel Alvarado


Good evening, Whimsy friends!  Tonight we welcome the lovely and talented Rachel Alvarado back to the blog!


Hello crafty friends! Welcome to night 21 of the Whimsy Stamps Annual 31 Nights of Halloween! I'm Rachel and I'm so happy to be guest designing tonight. I created a non-spooky, Halloween-themed box card tonight featuring some of the cute little candy corn critters from the "Candy Corn Dress Up Stamp Set". These fun little images are all decked out for a night of trick or treating!


To start my card, I first stamped my images with Memento Tuxedo Black Ink onto a sheet of Neenah Solar White 110lb Card Stock. I then used Copic Markers to color them and used my Brother ScanNCut to quickly cut them out. Next, I used a paper trimmer to cut some black card stock and make a box card base with the help of a scoring board as well as some adhesive. I added some grassy strips into the center of my box card by diecutting some black card stock with the grass dies from the Grass and Cloud Edger Die Set.


Copic Colors Used:

  • Oranges: YR00, YR02, YR04, YR09, YR19
  • Whites: 0, C00, C1, C3
  • Black: W5, W7, W9
  • Grays: W2, W4, W6
  • Purple: V01, V15, V17, V09
  • Yellows: Y13, YR20, YR21, V12

For my ink blended pieces, I blended a mix of Spiced Marmalade, Worn Lipstick, Seedless Preserves, Wilted Violet, and Black Ink Distress Inks. Lastly, I adhered my images with some liquid adhesive as well as some trees that I had die cut using the Tree Assortment Die Set.


Thanks so much for stopping by! If you liked this card and want some more crafty inspiration, please feel free to check out my INSTAGRAM feed!

Candy Corn Dress Up Clear Stamps |...
[ WHM ]
Tree Assortment Die Set | Whimsy Stamps
[ WHM ]
Grass and Cloud Edger Die Set |...
[ WHM ]

31 Nights of Halloween - Night 18 - Special Guest Vyvie Nguyen


Good evening, Whimsy friends!
Tonight we welcome the lovely Vyvie Nguyen to the blog!

Vyvie created a fun, brain-shaped shaker card featuring the adorable Zombie Boy stamp set.  
She found a brain clipart image and cut it out with her Cricut.  Next, she stamped the word "brains" repeatedly to create a colorful background.  She added sequins and used her Fuse tool to seal the shaker.


She stamped one of the Zombie Boy images and colored and fussy-cut it.  She also stamped a sentiment from Zombie Boy and added it and the colored image with dimensional adhesive.

Thanks for the adorable inspiration, Vyvie!
To see more of her work, please visit her on Instagram.


31 Nights of Halloween - Night 5


Hello there!!! Michelle B here, sharing a spooky cute Halloween wreath using the

Halloween Postage Clear Stamps and Leaf Layers Clear Stamps and a whole lotta masking!


Creating the wreath goes a little something like this...


I used a circle die and drew a circle in pencil and used that as a guide.
Stamp the images you want to see whole, than mask them. I used the candy corn, pumpkins, ghost, witch's hat, and skull with hat. I masked them, than stamped the spiders web and leaves as fillers. I played around several time until I achieved a wreath I was happy with. I stamped the leaves using black and orange inks.


I used Copic Markers to color. 
Witch's Hat: V12 V15 V17 V09, G14 G07, Y35 YR24
Ghost: BG10 BG11 BG13
Pumpkins: YR02 YR04 YR07 YR09 YG23 YG17
Skull with Hat: C1 C3 C6 C10, YG21 YG23 YG25 YG17
Candy Corn: Y08 Y18 Y38, E40 E41, YR04 YR07 YR09
Web: BV01
I fussy cut the wreath.


I trimmed a piece of red cardstock and adhered it to an A2 size card base. I adhered the wreath with foam tape. I embossed the sentiments with white embossing powder onto black cardstock. I added the perfect spider using the new Spiders and Webs Die Set. For a finishing touch I scattered some large star sequins.


In celebration of our annual 31 Nights of Halloween Event, Whimsy Stamps will be giving away 
$300 in Whimsy Stamps Gift Cards throughout the month of October!! 
Check out this post for more details.


Hope you'll share your projects with us!!


31 Night of Halloween - Night 3


Welcome to Night 3 of the 31 Night of Halloween! It's Barbara Sproatmeyer with you this evening.  For my project I wanted to take an every-day image and convert it to a Halloween theme so I chose to use Polka Dot Pals Kezia. I think she is great for all holidays and especially for those warmer climates. I love ice cream so it's not jut a summer thing for me. I can easily see her with a Christmas ice cream cone just as easily as a summer one. 


To make this a Halloween theme, I used Halloween colors then added cobwebs and spider friends. For another idea on how to use this stamp with a Halloween theme (without the spiders), you can visit my blog HERE. And for a speed coloring video showing the background and spider webs, visit my YouTube channel HERE.


There are so many different ways to color Polka Dot Pals Kezia and here are a few of my favorites - including one with a modified cotton candy cone. Yummy! Each of these were stamped with a light ink color so I could color over the ice cream. If you want to stamp in a darker color and still do this, just wipe away the ink of the ice cream before stamping. There are more details and marker lists on my blog HERE and HERE if you want them.


If you're looking for more inspiration using this set then check out my blog HERE - her puppy is super fun to use with other stamps too. But if you don't already have her in your collection, I think she is a must have! You can add her to your cart here and support me as the artist and designer: Polka Dot Pals Kezia.


Whimsy Stamps:


Copic Colors:
BV11, 13, 20, 23
YR16, 18
Y35
V06, 09, 17
C3
N1, 2, 3, 4, 5, 7, 9
YG17, 21, 23, 25