Showing posts with label Jeanette Comerford. Show all posts

31 Nights of Halloween - Night 14


Happy Thursday Crafty Friends! This is Jeanette and it is my turn to share a spooky project with you.  This is such a fun event - full of fun and inspiring projects and with some spooktacular prizes to boot!


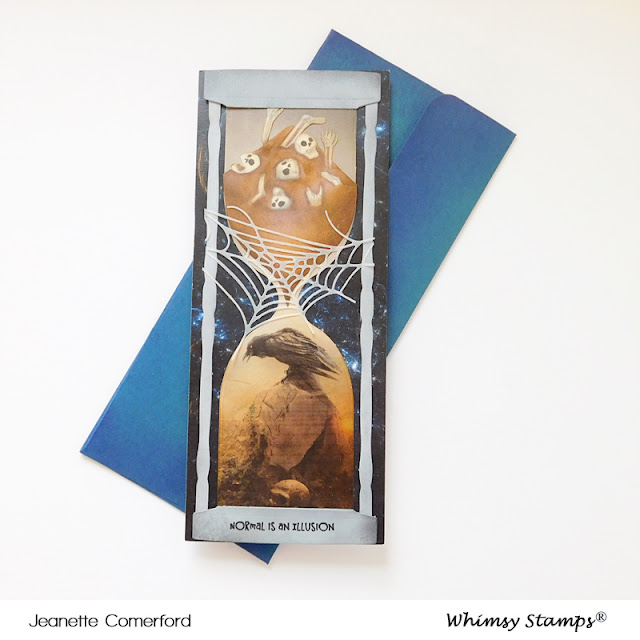
For my card, I created a Slimline card that measures 3.5" x 8.75".  I adhered one of the papers from the Nebula Slimline Paper Pack to serve as the background.  I made sure to choose a paper with a color palette that contrasted with what I was going to choose to put in my hourglass.

For the hourglass, I used one of the papers from the Nevermore 6x6 Paper Pack and the die in the Slimline Hourglass Die Set.  Making sure that the crow was well centered, I die cut it using the bottom portion of the Slimline Hourglass Die.  Then I cut the leftover paper using the upper portion of the die.  My leftover paper didn't completely fill in the upper portion but that is okay since I was going to be covering it up!  Just make sure that the upper part is fully there!

To create the top, base and sides, I used the corresponding dies in the Hourglass die set and cut them all out of grey cardstock.  I then blended on Distress Inks in Weathered Wood and Black Soot to give some dimension.  I used one of the sentiments in the Morticia Clear Stamp Set and stamped it with Versafine Black Onyx onto the base.


I then stamped the skulls using one of the stamps in the Scream Time Clear Stamp Set onto some white Neenah Solar Crest paper using some very light ink. I didn't want any of the lines to show once my coloring was finished.

I used these Copic Markers:
0, W00, W1,W3, W7, E70, E71, E74, E77

Once I had finished coloring, I blended on some Brushed Corduroy ink onto it so that it would better match the bottom portion of the hourglass with the patterned paper.  I then cut out the top portion with scissors and then used the die in the hourglass set to die cut out the bottom portion.  It took a little finessing but it really is worth it for the final look!

I die cut one of the webs in the Spiders & Webs Die set out of vellum and then I adhered all these elements into place onto my card.

I used some dark blue cardstock and the Slimline Envelope Builder Die Set to create a coordinating envelope.  I sponged the edges with some Wilted Violet Distress ink.
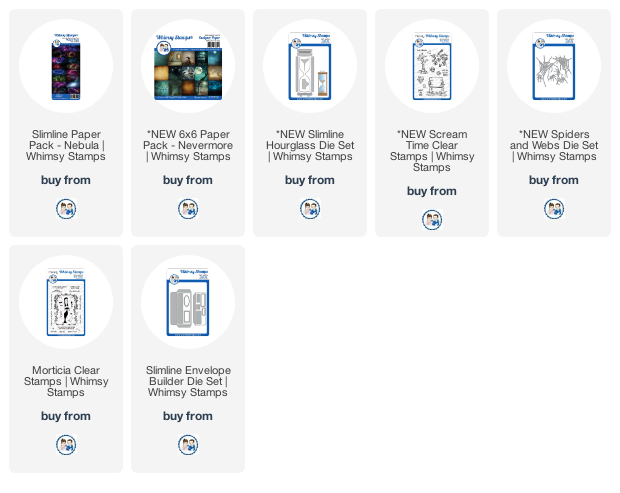
Supplies:

Thanks so much for stopping by today.  I had a lot of fun creating this card and I hope it inspires you to create your own spooky hourglass card!


Hugs Jeanette xxo

Spring Copic Coloration

 Happy Tuesday! This is Jeanette and I wanted to share this Springtime creation with you.  I made a coloration video that shares how I used Copic Markers to color up this very sweet digital image. You will find it lower down in this post.


I was inspired by the length of the papers in the Slimline Buttercup Paper pack to create a paper folder/wallet.  I then decorated it with the very sweet Love Me Not Mae Digital image as my focal image and a die cut using the Slimline Woodland Cottage Die.  This layout would also make an awesome slimline card.

I printed the image using my Epson printer onto Copic X-Pressit paper.


Here is the coloration video:


Supplies


Thanks so much for stopping by today!


Tuesday Tutorial - Holiday Hugs

 Happy Tuesday! This is Jeanette and I wanted to share how I created this Holiday Hugs card!


First, I chose some papers from the 6x6 Tartan Paper Pack.  This way I had a ready made color palette to work with.  The Warm Fuzzies Clear Stamp Set has contains all the images that you need to create a sweet little scene.  I stamped them all with a copic friendly ink and then colored them all in with copic markers.  Here are the ones that I used:

Santa Skin: E000,E00, E11, R20
Santa Hair & Beard: W1
Fluff on Hat: C00, C1, C3
Red Items: R08, RV14, R46
Green Items: G28, G46, YG03
Blue Items: B06, B04, B02
Dog: E31, E34, E35
Fireplace & Boots: C3, C5, C7, C9
Candles: B63, B66
Cat: E41, E42, E43


I then used the to create the background for my scene as well as a pretty scalloped border.  I adhered everything together and then added it to my card-base.  I chose to use 2 different patterns on my card but you might want just the one or even three or four!  The patterns in this pack are so divine that you'll want to use all of them.

Finally, I heat embossed the sentiment,which comes in the stamp set, with white embossing powder.  I believe that Santa hugs are still safe.


Warm Fuzzies Clear Stamp Set


6x6 Tartan Paper Pack


Thanks so much for stopping by! I hope that you were inspired by my wee card and I would like to take this opportunity to wish you a happy and safe Christmas!


Hugs Jeanette xxo


31 Nights of Halloween - Night 8

 Happy Thursday and Welcome to Day #8 of Whimsy Stamps' Annual 31 Nights  of Halloween! 


This is Jeanette and it is my turn to share a spooky creation with you.  There are lots of great prizes, gorgeous projects and much fun to be had.  Please see the end of this blog post for more complete details on the rules and how to enter.

I combined a bunch of Halloween products (both old ones and ones that are recently released) to create this sweet and not very scary Halloween Card!


My focal image is the digital stamp Witch Cinnamon.  I was able to size the image to perfectly fit within my frame.  That is what I love so much about digital stamps - they are so versatile and 100% customizable. I printed it on Copic X-Pressit paper and then colored it using many, many Copic Markers! I have listed them here for you.

Skin: E000 - E00 - E11 - E04 - R30 - R20
Hair: Y21, E17, E19
Hat & Cape: BV00, BV02, BV08, C5, C7, C9
Shirt, Shorts and Tights: BV02, BV04, BV08, C3
Broom: YR31, YR24, E31, E35
Shoes: C1, C3, C5,C7
Background: N9, V28, V25

To create the frame, I used the Day of the Dead Frame. I heat embossed it onto black cardstock using white embossing powder.  I colored in the image using Polychromos pencils and added some glitter using Stickles. Then I fussy cut out the frame.

The background of the card is made with one of the patterned papers found in the Vampire 6x6" paper pack.  I cut it to measure 5.25" square and then mounted in onto a 5.5" square card-base.

I then added some bats that I die cut from black cardstock using the Dracula Going Batty Die Set.  I added some stickles to then so that they would contrast the black cardstock and be seen better. I also die cut the sentiment from some glitter paper using the Chills Word Die Set.

Witch Cinnamon


Click here for all the details regarding rules and entries for your chance to win the $300 in prizes that will be given away throughout the month!

Thanks so much for stopping by and enjoy the rest of your day!


Technique Tuesday - Mermaid Escape Coloration


Happy Tuesday! This is Jeanette and today I wanted to share this card featuring one of my favorite stamp sets.  I love to read and I think that this set captures the magic of escaping into a great book!
I have used the Mermaid Escape Clear Stamp set and created a scene by combining it with the Slimlines Wave Die as well as the Lots of Dots Rubber Background stamp.

I cut some Bristol Smooth Card-stock three times using the Slimlines Wave Die.  On one set, I sponged on some blue and sand colored inks, then I glued to frame portion to two more of the die cut frame portions.  This way the frame sits up of the background.

I heat embossed the background pieces using some white embossing powder and the Lots of Dots Rubber Background stamp.  Then I adhered everything down together onto a card-base.

The anchor was made by heat embossing it with some Gold embossing power and then carefully fussy cutting it.  The sentiment is included in the Mermaid Escape Clear Stamp and was stamped using some Black Onyx Versafine ink.

All the images were stamped onto Copic Express paper using Memento London Fog ink. I then colored them with a combination of Copic Markers and Polychromos pencils.  I have included a short video here to share the coloring of the mermaid.


Mermaid Escape Clear Stamps - Whimsy Stamps

Slimline Waves Die - Whimsy Stamps

Lots of Dots Background Rubber Cling Stamp - Whimsy Stamps

Thanks so much for stopping by today. I hope that my card has given you a wee bit of inspiration!
Stay safe my friends!


Snow Couple's Season's Greetings

Happy Friday!  This is Jeanette  and I am here to share a simple festive card with you!


A quick and easy card to whip up if you need another card in a hurry! I used light blue card-stock to create an A2 sized card. I then lightly sponged the top portion of the card with some Blueprint Sketch Distress oxide to create a quick sky.  I used white card-stock and the Mountain Majesty Die Set as well as one of the dies in the Stitched Border Die Trio to create the background.

The sweet image is a digital image named Snow Couple.  I was able to size it to fit right into my little scene.  I colored it up with various copic markers before fussy cutting it out.


Thanks so much for taking the time to stop by today and I would like to take this opportunity to wish you all a wonderful holiday season. I hope that you enjoy every minute of it!


Hugs Jeanette


Whimsy Stamps and Tombow Collaboration – Day 3


All week long Whimsy Stamps and Tombow will be joining forces to bring you some amazing inspiration combining products from these great companies! Be sure to visit both companies’ blogs each day this week to see all of the incredible projects the designers have created AND to enter the giveaways!

Tombow's Dual Brush Water-based markers were one of my very first craft purchases many years ago and I really enjoy using them when I water-color my images.  The colors are so very vivid!  They have a new product: ABT Pro Alchohol based pens.  They also have dual brushes and are available in color-way sets of 5 markers that are meant to blend together!

In this project, I have use the water-based Tombow Markers as well as the Purple Toned ABT Pro markers to color in this Stained Glass Ornaments image.  I first embossed the rubber stamp used some gold embossing powder onto Bristol Smooth Cardstock.  Then, I spent a lovely pocket of time water-coloring each of the ornaments.  Once completed and dry, I added some details with a gold gel pen.  I trimmed down my paper, added it to an A2-sized card-base with a gold card-stock mat.

To create the sentiment I used more of the gold card-stock and die-cut it using the Christmas Large Word Die. It was the perfect way to finish off this card!

To enter to win the $25 gift certificate from Whimsy Stamps and the prize package from Tombow, simply leave a comment on each of the collaboration posts this week on the Whimsy blog.  All comments must be left by midnight EST on Friday, December 13th.  Two commenters - one for the Whimsy gift certificate and one for the Tombow package - will be randomly-selected and announced on the Whimsy blog on Saturday, December 14th.

Don’t forget to visit the Tombow blog each day, also, for more inspiration from the Tombow designers!


Thanks for stopping by today!


Christmas Mice

Happy Monday! Jeanette here and I am super to share this new card with you!
Whimsy Stamps has so many gorgeous new Winter/Christmas themed products that it is hard to choose! I have to admit that this set was first because I could not resist these sweet mice from the Very Mice Christmas Clear Stamp set.


The expressions on their faces are so sweet! I stamped the image using Memento London Fog ink so that I get a softer look. It isn’t “no-line” coloring but it almost is!  I colored with Copic Markers and then went over some of the areas with colored pencils to deepen some of the shadows.  Always use your pencils after your Copics; otherwise you will ruin your markers.

Originally, I had chosen another piece of patterned paper for this card, but after having completed the coloration, I realised that it was too “busy” and was actually competing with the image.  I found this paper instead, and I think it ties in with the wee mouse’s scarf and compliments the image without overpowering it!

The paper was cut using one of the dies in the Wavy Edgers Die Set.  I absolutely love the pretty scalloped curve and how it looks at the top of my card.  I then used my favorite Christmas Large Word Die to create my sentiment.  I cut it out twice and adhered them together before adding to my card.  I love the extra dimension.

Here’s a close-up of these adorable mice!


Supplies


Thanks so much for stopping by!
Hugs Jeanette xxo

31 Nights of Halloween - Night 8 - Hocus Pocus


This is Jeanette and it is my turn to welcome you to the Whimsy Stamps 31 Nights of Halloween Blog Celebration! Tonight is Night #8

This is a month long celebration with many prizes to be won. Be sure to read down to the end of this post you can read all about today's prize and I will tell you how to enter! 


First I want to share a little about my card!


There is absolutely no stamping on my card, which really made the whole process very fast and easy! When I saw the gorgeous new Halloween Paper pack, I knew that I could use some of the different sheets to create framed Halloween characters in a fun slimline card!  


I used the Slimline Scallop die to cut out some black card-stock.  I spritzed it with some watered down white acrylic paint and then adhered it to my card-base.  I then used the same die to cut out some silvery glitter paper so that I could use those for the scalloped frames for my images.  I then searched through the amazing new Hocus Pocus 6x6 paper pack to find some spooky images which I then cut out using the same die once again!


How would you like to win Dracula I Compel You & It's A Nail Biter Clear Stamps Set designed by our wonderful Deb Davis?

Dracula I Compel You Clear Stamps  It's a Nail Biter Clear Stamps

Just answer this question in the comment section below:

I chose my images for my card from the Hocus Pocus Paper Pack. Which one is your favorite?
The Skull, the Cat, or the Ghost?

Check back here on the Whimsy Stamps blog on the evening of October 31st to see if you are one of our winners.
Good Luck everyone and enjoy the rest of this spooky event!


Hugs Jeanette xxo