Hi Everyone, and welcome back! Today is my first official blog post for Whimsy Stamps, and I am so excited to share this inlaid die cut card using the
July Paper Door kit stamps and dies, Beaucoup Bouquet. Have you ordered your kit yet?
Technique: Inlaid die cutting
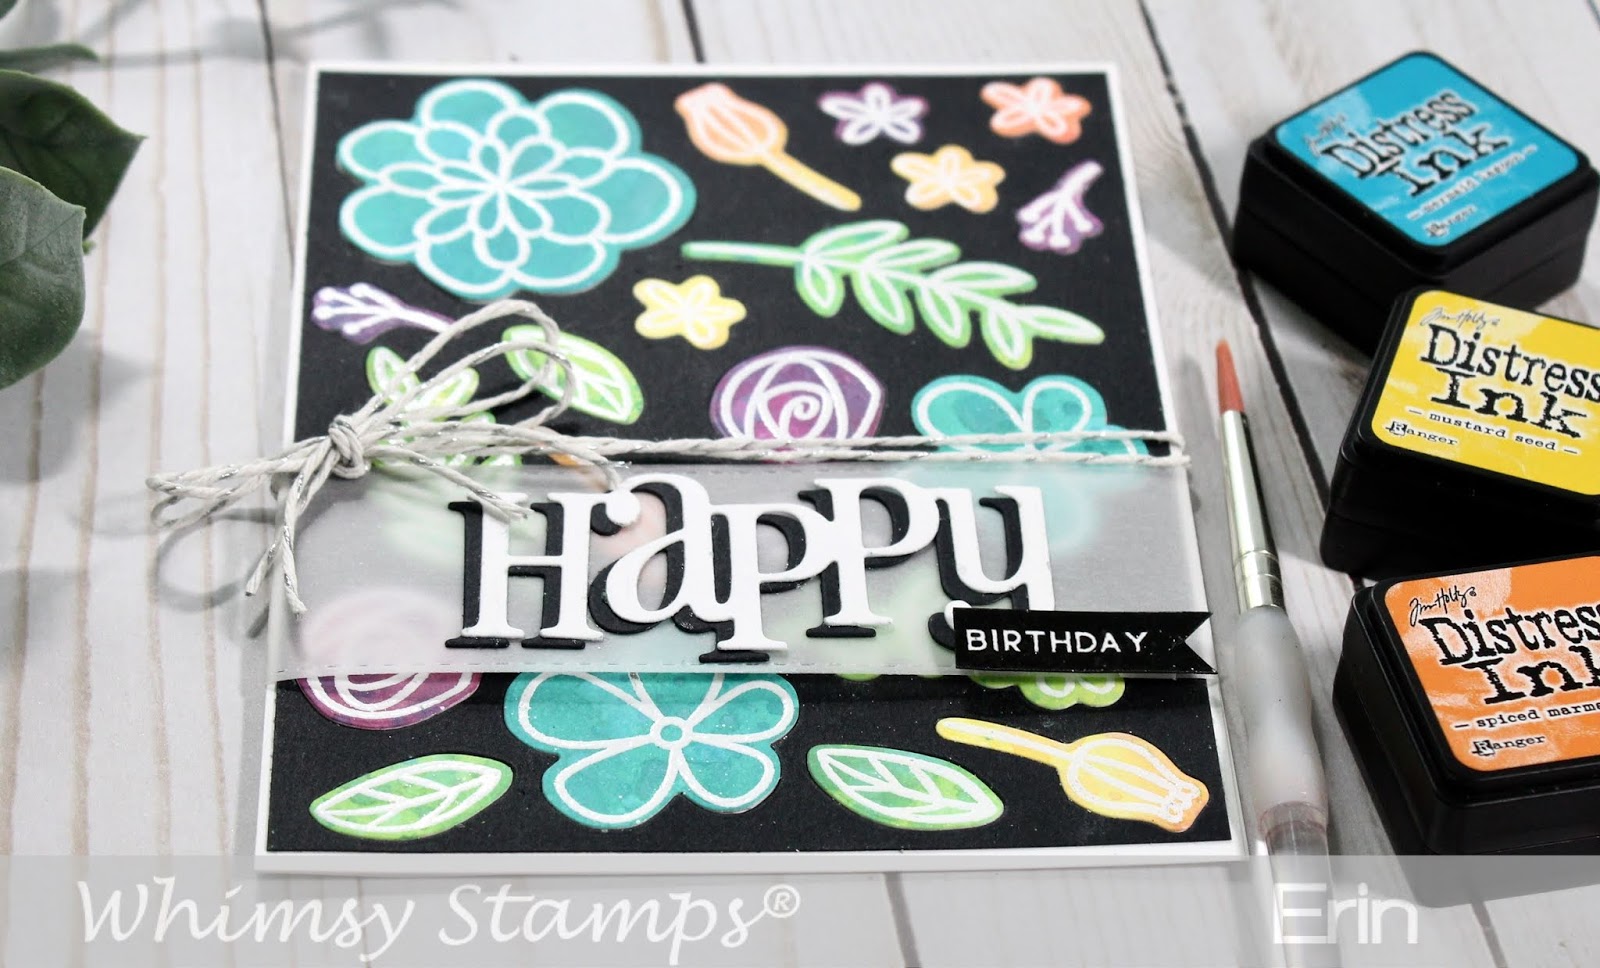
I began by creating my flower and leaf background papers using Distress Oxide inks on Bristol smooth paper. First I “smooshed” the ink pads (two colors at a time for this project) onto the craft mat, spritzed with water until the ink pooled into drops, and blotted or pulled the paper through the wet ink. At times I spritzed the paper with more water to create a marbled effect. Then I dried it with the heat gun, and repeated the process a couple more times. TIP: The nice thing about Oxide inks is that they layer over previous colors, so you don’t get a “muddy” effect. Finally, I spritzed the paper with water, let it sit for a couple of seconds, dabbed it with a paper towel, and dried with a heat gun. I repeated until I was pleased with the outcome.
 |
| Distress Oxide inks used: Picked raspberry, seedless preserves, mermaid lagoon, cracked pistachio, squeezed lemonade, abandoned coral, lucky clover, and twisted citron. |
TIP: Set your inked paper aside and die cut your background to insure that your paper is completely dry before embossing! The inking process is very wet, and the embossing powder will stick everywhere that the inked paper is not absolutely dry.
 |
| Can you see the "triangle" of flowers, and the visual balance of threes? |
When designing a card layout, I usually stick to the tried-and-true composition rule of using odd numbers or groups of three, and you can see that in this background. I cut a piece of black cardstock to A2 size (5.5” x 4.24”), and began by die cutting one large flower in the upper left corner. Then I cut two smaller flowers forming a visual triangle (another design “rule” I use often). Can you see it? I worked from there to place the dies, and kept a small border around the edge. When the background was finished, I returned to my inked paper to emboss and cut the flowers.

Next I completely covered the inked paper with an anti-static tool to help insure I didn't get excess powder everywhere, and stamped all of the flower and leaf images with VersaMark then heat embossed. Finally, I die cut all of my pieces for my background, and glued them into place. TIP: I used my Tombow Mono eraser to remove some extra adhesive, ink, and “gunk” from the background panel. I found that all of the inking, taping, and glueing was messy, and the eraser helped clean up the final product to make it look clean and finished.
Finally, I trimmed the black background panel just a little to leave a white edge on the card. Then I finished it by adding a vellum strip, the die cut "Happy" sentiment with the "Birthday" banner, and a twine bow.
What do you think? I can't wait to see everything you create with this month's kit. Be sure to join and post your creations on the Whimsy Stamps and Inspiration Facebook page! Love and crafty hugs!
Erin