Showing posts with label Bold ABC Die Set. Show all posts

Special Guest - Mary-Ann Maldonado


Hello, Whimsy friends!  Today we welcome the talented Mary-Ann Maldonado the blog.

Good morning friends!
I was so excited to be asked to Guest Design for Whimsy Stamps
They told me to order a couple things and that was the hardest thing evah!!!

I did choose a couple things.  One, the cutest thing, will be shared here on the 13th.  
OMG. You WILL NEED it.  But, for today's post, I chose classic, reusable items.  Items that will go far in my stash as a scrapbooker and card maker.  

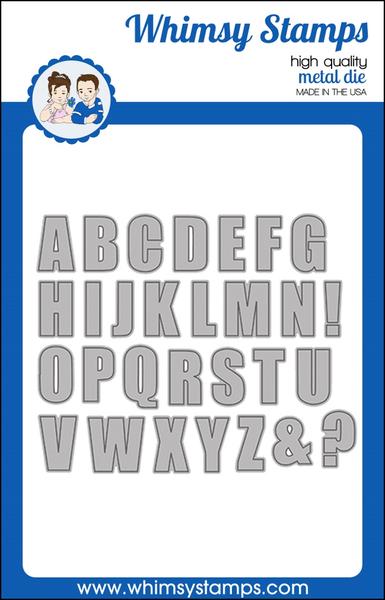
I chose the Bold ABC Dies Set and the Checkerboard Die.  The alphas can be used in so many ways.  I don't see them being too far out of reach for future projects.  The Checkerboard Die is a great background for any occasion.  You will see below how easy it is to change it for your needs.  

I think the best part about the Checkerboard Die is the automatic confetti that is produced.  I think adding them to the inside of the card so when the recipient opens them, they fall all over is a grand idea!!  An extra surprise.  They may not like the clean up, but I would love the reaction!

Here are my cards that I created for today's blog post.  I hope you are inspired to grab the dies for yourself.  Just click on the links and you will be directed to the proper items.  


Thank you, Mary-Ann, for this colorful and fun inspiration!  
To see more of Mary-Ann's work, visit her on her blog.


Whimsy Stamps and Therm O Web Collaboration Day 4 - Kimberly

Image may contain: text

Whimsy Stamps and Therm O Web are teaming up once again for a fabulous week of inspiration and prizes! Be sure to visit both blogs all week long for some amazing ideas and to enter to win!"

It's Kimberly here with you, and I have two very sugary sweet confections for you today.
The first is a stacked cupcake card!


To make the "Stacked Cupcake" card:
 Prepare white card base of 4.25 x 5.5. Cut two panels of white card stock 3.75 x 5.5. Die cut the zig zag edger down both sides of the card base. On one panel, apply the Poppin Pink over the Sending Sunshine Stencil. Once dry, sponge distress orange ink over entire panel. On the second panel, line up letters from the 
Bold ABC Die Set spelling upcake, 
running through the die cutting machine, once again adding the c. 
Mask and offset stamp the Calories Schmalories cupcakes in alcohol compatible black ink.
Color cupcakes with alcohol markers and add 
a dusting of fine clear glitter.
Adhere die cut layer over stencil layer, 
and affix to the base card.

The second is another yummy cupcake card with an explosion of sweetness!


To make the "Yum! Cupcake" card:
Prepare white card base of 4.25 x 5.5. Cut a panel of white card stock 4.5 x 3.5. Apply Orange Glow over 
the Whimsy Stamps Honeycomb Drips Stencil.
Mask and ink a cupcake from the Calories Schmalories set to add the candle. Color and cut images.  
Add sentiment onto a .5 x 3.5 in white card stock strip. 
Adhere stencil panel to card base, add sentiment strip with 3 iCraft Dots 1 1/2 glue dots adding cupcake with one glue dot onto the upper portion of the cupcake image to the stencil area. A small liquid glue will affix the bottom portion of the cupcake to the sentiment strip. 
Add a dusting of fine clear glitter.


Here are details of the Whimsy Stamps and Therm O Web
supplies that have used in creating both cards: 

Therm O Web:Rina K. Designs Neon Glitz Glitter Gel
Rina K. Designs Neon Glitz Glitter Gel - Poppin' Pink   Rina K. Designs Neon Glitz Glitter Gel - Orange Glow
Rina K. Designs StampnStencil
Rina K. Designs StampnStencil Detail Stencil, Sending Sunshine pictureiCraft Adhesive™ Dots•  1.5 in picture

Whimsy Stamps: Calories Schmalories Clear Stamps

Bold ABC Die Set

Calories Schmalories Clear Stamps - Whimsy Stamps    Bold ABC Die Set - Whimsy Stamps    

Festive Edger Die Set

Festive Edger Die Set - Whimsy Stamps   

**NEW Honeycomb Drips Stencil

*NEW Honeycomb Drips Stencil - Whimsy Stamps

 =======================================
PRIZE DETAILS:
"Each company is giving away two $25 gift certificates - 1 here on the Whimsy blog and 1 on the Therm O Web blog. To increase your chances of winning, leave a comment on each of the collaboration posts on both blogs. Comments must be left by Monday, July 19th at midnight EST, and winners will be randomly-selected and announced on Wednesday, July 21st."

For more amazing projects and ideas from 
Whimsy Stamp and their Design Team
 as well as Guest Designers, 
follow Whimsy Stamps on the following
 Social Media Platforms:

 - Whimsy Stamps LLC Facebook Page

Tall, Dork and Sweet - Tutorial Tuesday with Toni


Hello, Whimsy fans! I'm sharing with you a little birthday card I made for my not so little sister. She's like NBA tall. Not WNBA...NBA. Yup, a tall drink of water. So I just had to play around with the Giraffes Smiles set.


First things first, I created the background by sponging Distress Oxides through the Giraffe Stencil. The stencil repeats so it was easy to reposition it as I went up the slimline base. I kept each color strip about the same height as each section of the Slimline Waves die.


Now the giraffe was really fun to do. I first stamped the body with Memento Tuxedo Black, having masked the head so it wouldn't stamp. I repeated the same procedure (far) above, masking the body this time so only the head would stamp.

I used a ruler and a Copic Multi-liner to connect the head and body then drew in spots by hand.


I colored up the giraffe using Copics E41, 42, 43, 55, 57, and 59. You don't even notice that the hand drawn spots are different.  But did you notice I wove the giraffe's head through the Slimline Waves die?  Just for fun.


I thought I would emphasize the height of the card using the Bold ABCs for "sweet." I sponged those with the same Distress Oxides as the background, trying to keep the transitions about the same. I added a shadow letter so the sentiment would pop rather than fade. I also embossed part of one of the Giraffe Smiles sentiments onto a Quick Strip.


That black strip immediately draws the eye. And speaking of dies, I added glasses and used one of my Copic Multiliners to embiggen the eyes a bit. So cute!

If you haven't already, be sure to check out the Whimsy January release.

You can also check out my other creations by visiting my blog, Frankie Helps Craft, my Instagram, or my Pinterest Board.


Happy Hello

Hello Whimsy Friends, Iris here! Welcome to the Whimsy blog and Happy TGIF!

On my card today I used several different Whimsy products. Everything from the Whimsy store I used on my card will be linked below.


First I created an alcohol ink background on YUPO paper with red, orange and yellow colors and applied red foil marbles. (How to do this can be found here). Then I stamped the Flower Puffs Background with Versamark ink and embossed with white super fine detail embossing powder. Heat embossing on YUPO paper is a bit tricky because YUPO is a synthetic paper and is very heat sensitive like vellum or acetate. Make sure your heat tool is very hot before you start melting the EP. Move your heat tool constantly do not stay in one spot too long or the YUPO will warp. Only apply heat in short intervals.
The word HAPPY was die cut from white heavy weight cardstock three times using the Bold ABC die set. I layered the letters to get a 3D effect. I die cut the foliage branch once from the same alcohol ink background and twice from red cardstock - layered in the same way as the letters. 

The word hello is a chipboard element also available from Whimsy stamps. I heat embossed the backing layer white and colored the main word with a red Copic marker.

I cut a piece of red cardstock and die cut one side using one of the Envelope Edger dies and on the opposite site I used the Straight Edger die set.

After assembling my card I added enamel dots and sequins to embellish. On the bold letters I added dots with a glue pen and after they dried I added red foil. I got this idea with the glue pen and foil from Jennifer McGuire. Love it and works great.


Whimsy products used:


Hello Word Chipboard   Straight Edger Die Set    *NEW Bold ABC Die Set   Copic Sketch Markers Cadmium Red [Pack Of 3] (3PK-R27S)   *NEW Envelope Edger Die Set     VersaMark Full-Size Ink Pad - Original (Clear)   White Embossing Powder    Christmas Cheer Enamel Dots     Leaf Foliage 2 Die Set    Sequin Pack - Sugar Maple       


Thanks for visiting us here today on the Whimsy blog!

Hugs,

Fun in the Sun

Good Morning. Dorinda here today to share with you.

I know you've noticed the newest artist, Elisabeth Bell, to join with Whimsy Stamps.
I am a longtime fan and so was super excited.
 This super adorable little one is called
She just makes me happy.

Other Whimsy Stamps products used:


I've colored Sunshine with Copic markers 
and cut the image out with the smaller retangle from Card Builder Windows Die Set.
Then using Bold ABC Die Set, I've cut out the word "FUN" and added the letters to 
the smallest piece of Shaker Maker Banner Die Set.


Whimsy Stamps Products Used:

*NEW Sunshine*NEW Bold ABC Die SetShaker Maker Banner Die SetCard Builder Windows Die Set