Showing posts with label Disterss Oxide. Show all posts

31 Nights of Halloween - Night 30 - Special Guest Kulbir Kirkland


This image has an empty alt attribute; its file name is whimsy-blog-badge-special-guest-1.jpg

Good evening, Whimsy friends!  

Tonight we welcome back the lovely Kulbir Kirkland for some creepy inspiration.


Hello friends I am so excited to back as a guest designer for Whimsy Stamps 31 Days of Halloween. I have always wanted to create a spooky tombstone ectetera tag. The Grim Reaper stamp set was so perfect for it.


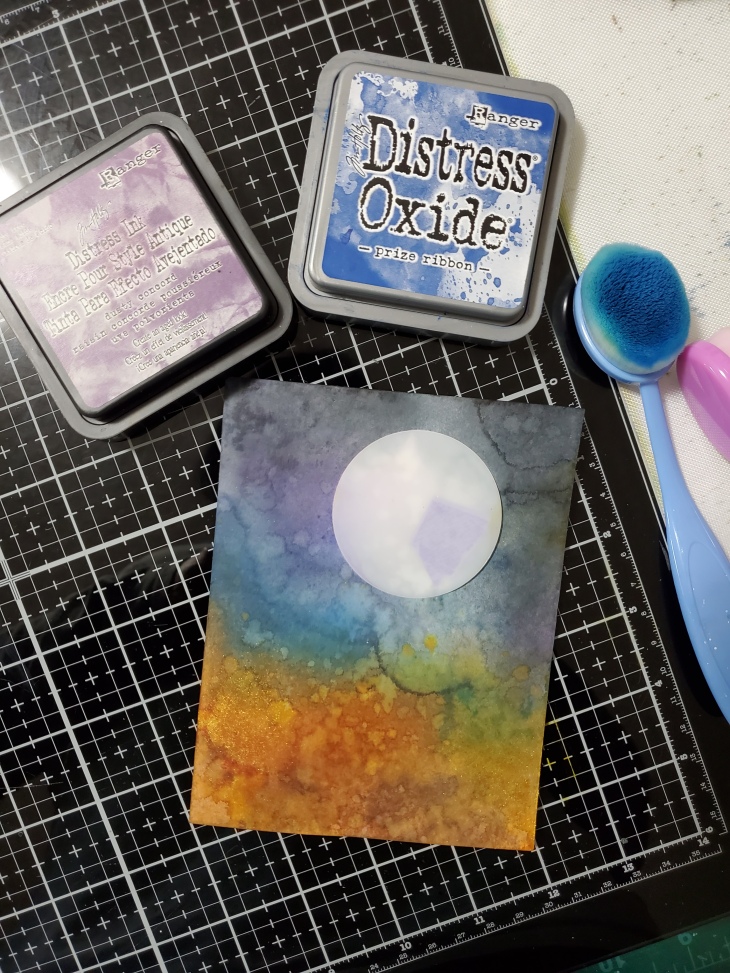
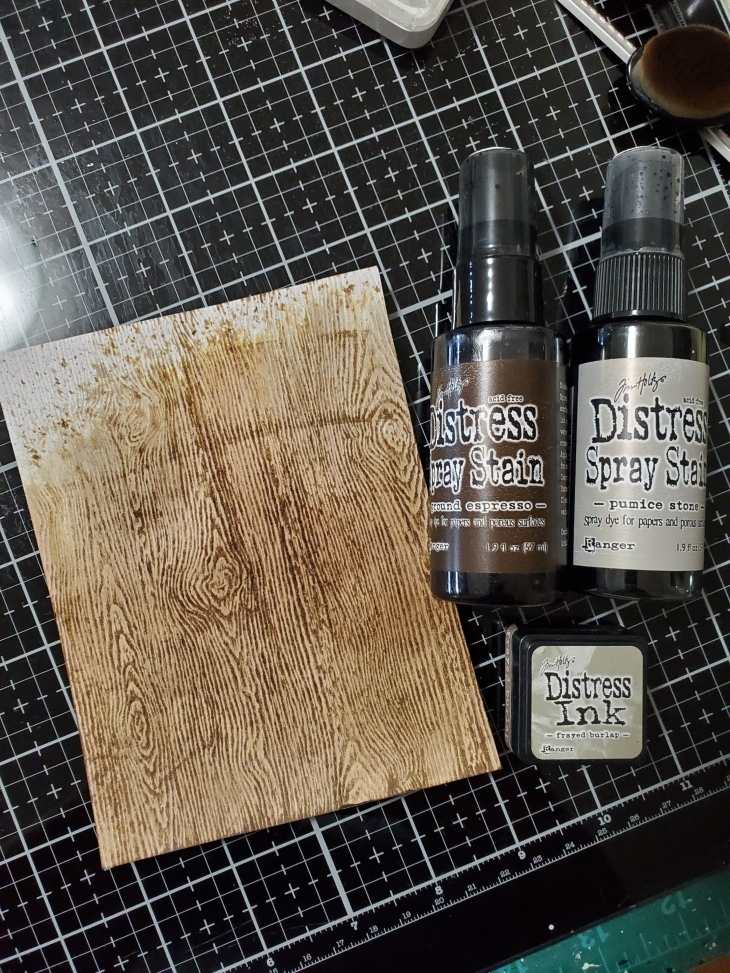
I used the small tombstone etcetera tag and covered it it with gesso. After it had dried I started layering on hickory smoke , pumice stone and a little bit of black soot. After a couple of coats I added on some translucent grit paste and some crypt grave paste.

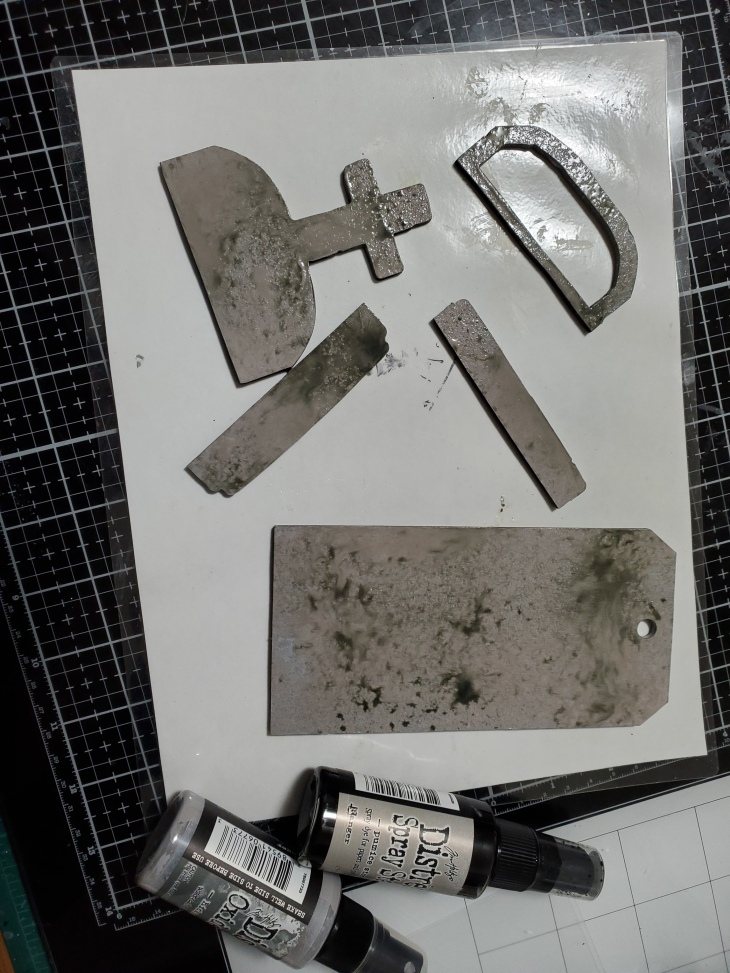
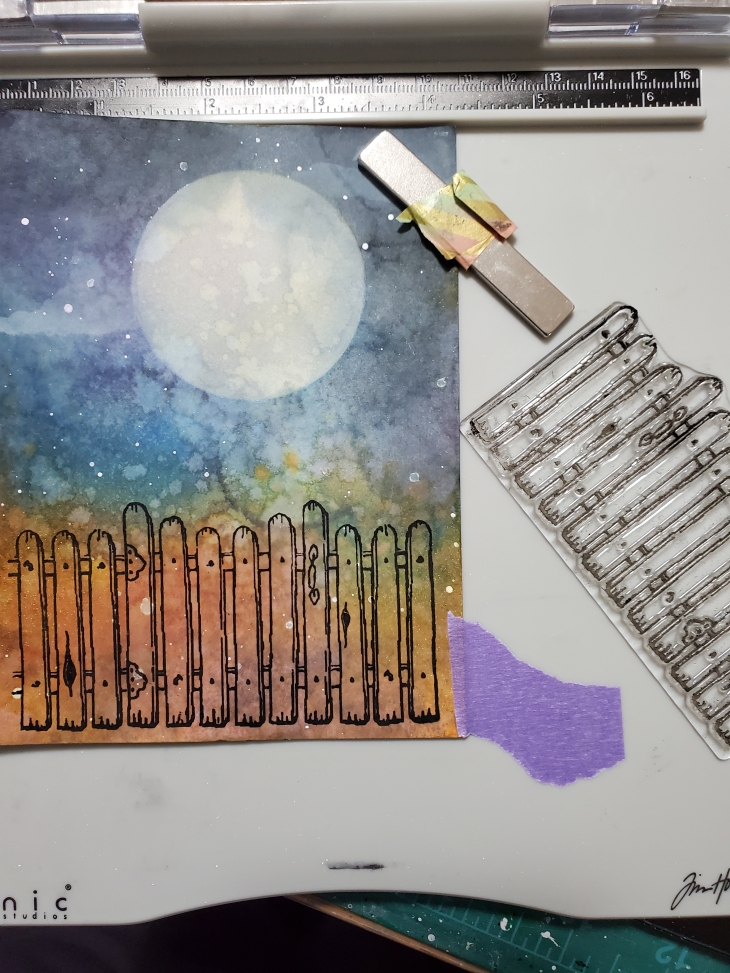
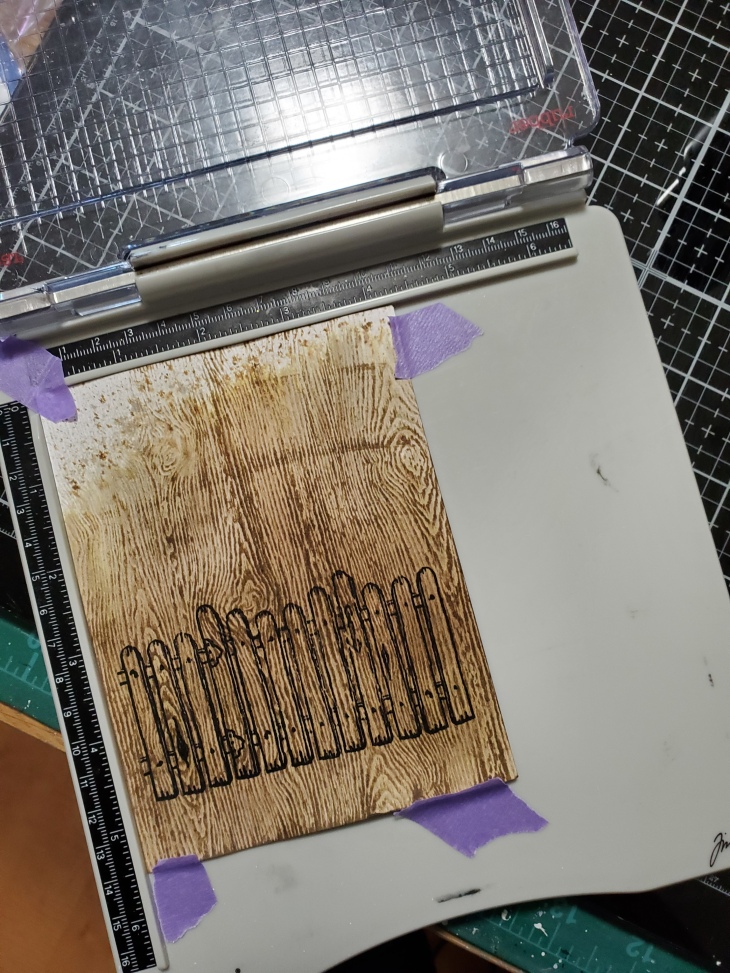
I added on some crackle paste for added texture. Using collage medium I started gluing pieces together and clamping them in place...yes I raided my husband's workshop :) I stamped the grim reaper onto the tag only because I could cut all the cool little bits on the bottom of his robe. I stamped the image onto a piece of distress water color paperwork and fussy cut it.

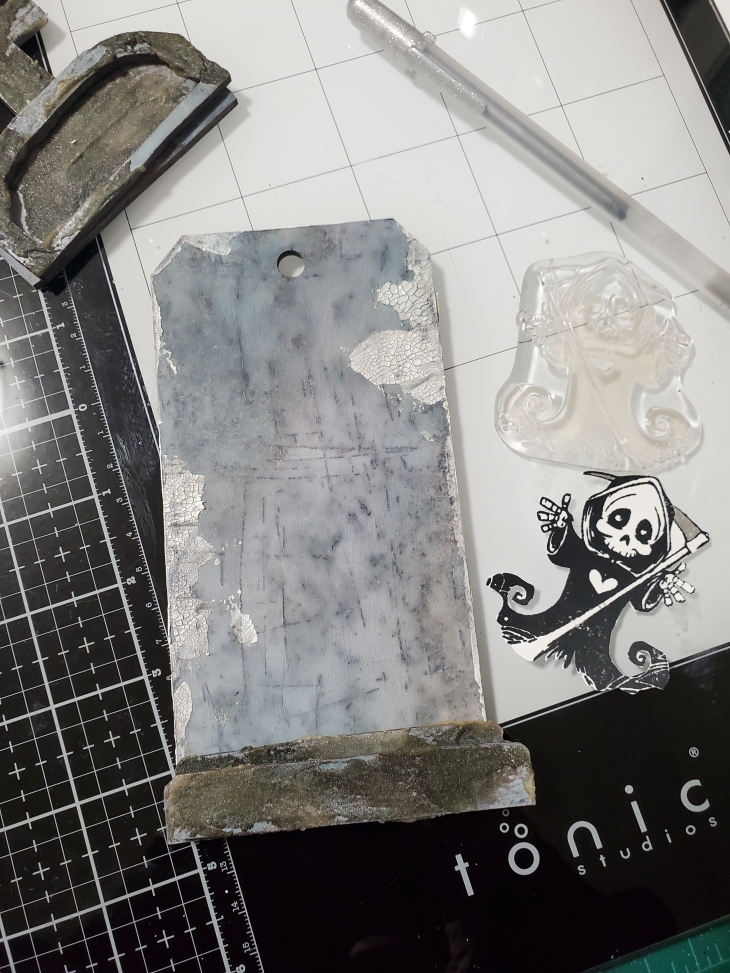
I colored the grim reaper with my distress inks and layrered it on top of the one I had stamped. I don't think I really needed to stamp it onto the tag since the smoke was covering the bottom of the reaper. Always learning :) I really wanted the illusion of smoke so I got some batting and sprayed it with hickory smoke oxide spray and glued it in place. For the R.I.P I wasn't able to stamp on top of the paste so I ended up embossing it onto clear acetate and put it in between the cross and the top frame. For the sentiment I used silver cardstock and stamped it with archival ink and ran it through with Tim Holtz Foundery embossing folder.


To finish off the tag I used some moss and glued it in random spots. I had so much fun putting this tag together. Hope you liked this project and if you give it a try, please do share. Happy Halloween my crafty friends.


You can find links to the supplies I've used below: click on the picture and it will take you directly to the product. If purchased through the link provided I will receive a small commission at no extra cost to you. I truly appreciate all your amazing support. Looking forward to sharing many more projects and techniques including my favorite mixed media.

Thank you so much for taking the time to stop by today. Hope you will subscribe to my blog for future posts. See you again soon with another crafty project.


Thank you, Kulbir, for this awesome inspiration!  To see more of Kulbir's work, please check her out on Instagram.


Grim Reaper Clear Stamps


31 Nights of Halloween - Night 23 - Special Guest Kulbir Kirkland

Good evening, Whimsy fans! 

Tonight you are in for quite a treat as we welcome the talented Kulbir Kirkland to the blog!


Hello friends I am so excited to have been invited to be a guest designer for Whimsy Stamps 31 Days of Halloween. Definitely my favorite time of the year. I am sharing a card I made using some super fun and creepy Whimsy stamp sets and ..distress everything :)


My cardstock for this project was Distress Heavystock. I first used distress spray colors salty ocean, wilted violet, rusty hinge, walnut stain and black soot. After I had dried it I went over with prize ribbon and dusty concord , sprtiz with water and dried it with my heat tool. Last part I add sprays of flickering candle and splatters of Dina Wakely white acrylic paint.


I stamped on the same fence from Attempted Murder with black archival ink.


Using distress woodgrain cardstock I inked it up using ground espress and pumice stone distress spray and dried with a heat tool. After it had dried I added some frayed burlap with a blending brush. Inked up the same fence and stamped it onto of the woodgrain using the same archival ink.


Yes I cut up each panel and using foam tape I pieced it on top the original fence I had stamped on the panel. I inked up the cemetery from the Halloween Scream and stamped it above the fence to give the illusion that it was on the other side.


To finish off the card I used colored the branch using copic markers and popped everything up on foam tape. I wanted the Happy Halloween sentiment to look like it was bolted to the fence. For that I used the hardware set from Tim Holtz Idea-ology. I cut the panel down to fit on an A2 card base.


You can find links to the supplies I've used below: click on the picture and it will take you directly to the product. If purchased through the link provided I will receive a small commission at no extra cost to you. I truly appreciate all your amazing support. Looking forward to sharing many more projects and techniques including my favorite mixed media.

Halloween Scream Clear StampsAttempted Murder Clear Stamps


Thank you so much for taking the time to stop by today. Hope you will subscribe to my blog for future posts. See you again soon with another crafty project.

31 Nights of Halloween - Night 6 - Special Guest Toni Maddox


Hello, Whimsy friends! Today we welcome back the amazing Toni Maddox to the blog!


Hi, everyone!  How could I say no to guesting for the Whimsy Annual 31 Nights of Halloween event?  Whimy Halloween products are among my absolute favs!

I decided to use the "failed" background from my Halloween Caveman Zog post. I thought it turned out too dark plus my cat spilled water on part of it (thanks, cat--argh!) but it's perfect for a graveyard scene. 
I had sponged the card front with Distress Oxide Distress Oxide Vintage Photo, Candied Apple, Carved Pumpkin, and Mustard Seed. I then stamped the Goth Skulls randomly on the background using Candied Apple and Salvaged Patina. To use the background for this card, I stamped the WTF?! Background Stamp with Versafine Onyx Black.


Once I had the background done, I started on building the scene using the Build a Graveyard and Spiders & Webs dies. I printed the "Rest In Pieces" sentiment and airbrushed both the gravestone and Ranger Grit Paste graveyard dirt with my Copic Airbrush.


I added the fence, bats, hissing cat and skull from the Build a Graveyard set so my little Zombie Boy would have the perfect backdrop to tell us about his mother. LOL.  I used the sentiment from the Cute But Psycho set cut out with a Comic Speech Bubble, distressing the latter with a bit of Distress Oxide Black Soot remaining on my brush.

I hope you enjoyed my card and have a great rest of your week!  If you'd like to check out my other creations, you can visit my blog, Frankie Helps Craft, my Instagram, or my Pinterest Board.

Thank you, Toni, for this fun inspiration!

Goth Skulls Background Rubber Cling Stamp
Build-a-Graveyard Die Set

Special Guest - Toni Maddox


Hello, Whimsy friends! Today we welcome the amazing Toni Maddox to the blog!


Hi, everyone!  I'm delighted to be guesting on the Whimsy Stamps blog!

With Halloween in the air, I chose to play with a variety of Halloween products, combining them with Caveman Zog for a twist.

Caveman Zog Clear Stamps Goth Skulls Background Rubber Cling Stamp

I sponged the card base using, from the bottom up, Distress Oxide Vintage Photo, Wilted Violet, Candied Apple, Carved Pumpkin, and Mustard Seed. I then stamped the Goth Skulls randomly onto the background using Distress Oxide Salvaged Patina and Candied Apple.


That tiffany blue really pops against the background colors so I chose to use it to cut out the Hill House, Build a Graveyard fence, and Ugh! outline.

Slimline Hill House Die Build-a-Graveyard Die Set

I colored up Caveman Zog using Copics in the no line style.  He was pretty darn easy to color that way since he's mostly naked so not too many little areas to color--at least not above the loin cloth.


For the sentiment combination, I sponged Distress Oxide Mustard Seed, Candied Apple and a touch of Wilted Violet onto the Ugh! letters. I love the look of the tiffany blue on top of the colors of the background then those colors on top of the tiffany blue.

UGH! Word and Shadow Die Set Comic Speech Bubbles Die Set

I created the sentiment in MS Word and printed it onto printer paper which I then adhered to cardstock for more body.  I cut that out with one of the Comic Speech Bubbles.  I particularly like how it looks nestled beneath Ugh!, don't you? 


I hope you enjoyed my card and have a great rest of your week!  If you'd like to check out my other creations, you can visit my blog, Frankie Helps Craft, my Instagram, or my Pinterest Board.

And, don't forget that the Annual 31 Nights of Halloween blog celebration starts on Friday. You'll see me there for sure!

Special Guest - Lacey Robin


Hello, Whimsy friends!  
You are in for a real treat because today we have the lovely Lacey Robin on the blog!


Hi, Whimsy fans!  I created this amazing LSU themed layout for my first guest design spot with Whimsy Stamps! 


I started out by using the Tiger Stripes Stencil with a combination of Distress Oxides in Mustard Seed, Wild Honey, Blueprint Sketch and Seedless Preserves to make an ombré blend for my background. I also added splatters of the same inks.

I used the Starring Hearts Paper for some of my paper strips and finished off my title with the Awesome Large Word Die

Thanks, Lacey, for this awesome inspiration!  Those tiger stripes are so cool and perfect for LSU fans!

To see more of Lacey's work, be sure to check her out on Instagram.