31 Nights of Halloween - Night 28


Hi there, Dawn here from the Video Design Team. I'm so glad to be back on the Whimsy Stamps Blog for the Annual 31 Nights of Halloween Blog Celebration. Hope your enjoying all the Spooktacular fun Halloween Cards.

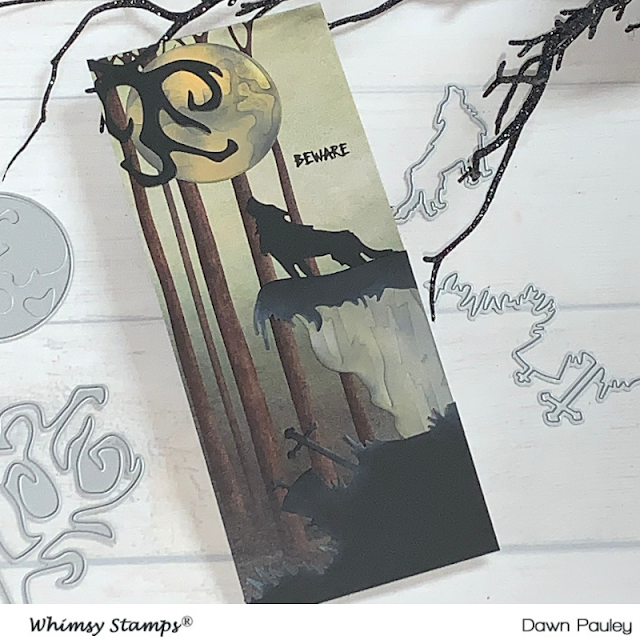
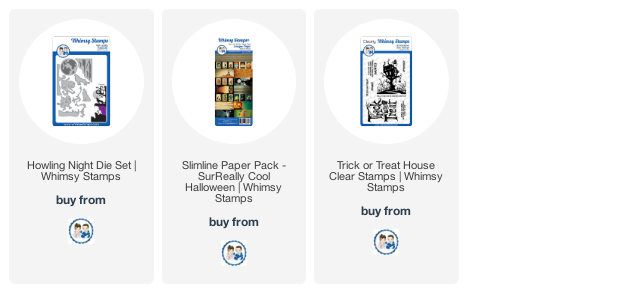
Today, I'm sharing how I made this HOWLING Scary Halloween card. You'll love how easy it is to make this card. I used the Whimsy Stamps Howling Night Die Set. I die cut the wolf, cemetery, top of the cliff and the scary tree branch from black card stock.  


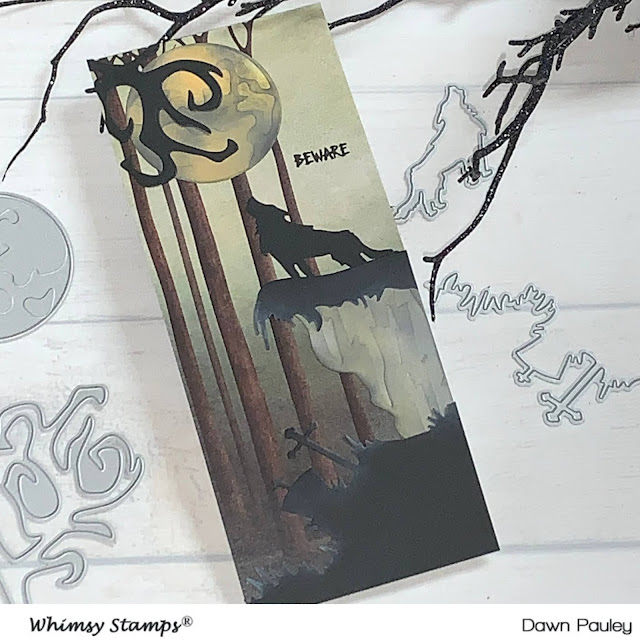
I die cut the moon and the cliff from white card stock. I used some Distress Oxide Inks and my blending brush to color the moon in. First, used a very light amount of Distress Oxide Fossilized Amber to ink blend the whole moon. Then, I lightly went over the edges of the moon and the middle with some Distress Oxide Black Soot. To finish off the moon, I took a small amount of Distress Oxide Hickory Smoke and went over the black soot with it. 

I ink blended the white cliff with some Distress Oxide Hickory Smoke and then used the blending brush with the Fossilized Amber on it to add a little here and there over the Hickory Smoke. I didn't add any extra ink to my blending brush because I only wanted to add a small amount. 

Next, I take some White Pigment Ink and lightly go around the bottom edges of the top of the cliff. (the pointy edges that hang over the cliff).
Then, I take the same white pigment ink and light put a small amount on the top of all the pieces of the graveyard. 

I take one of the Whimsy Stamps Slimline SurReally Cool Halloween Papers (the one with the trees) and I use that for my background. I adhere the moon to the top left hand corner and then I cut the scary tree branch down and adhered it over the moon. 
I adhered the cemetery to the bottom of the card leaving a space in the top right hand corner to slide the cliff behind it. Then, I adhere the cliff overhang onto the cliff and adhere the wolf onto top of the cliff. 

I stamp the sentiment "BEWARE" from the Whimsy Stamps Trick or Treat House Stamp Set in black ink onto the card. 
I cut a piece of white card stock to 8" x 7" and scor it at 3 1/2". I trimmed the card front down to fit the white card stock and then I adhered the card front to the folded card stock. 


That will complete my card today. 


Thanks for stopping by and have yourself a wonderful day!


31 Nights of Halloween - Night 27 - Special Guest Vyvie Nguyen


Good evening, Whimsy friends! 
Tonight we welcome the lovely Vyvie Nguyen back for some Halloween inspiration.


Vyvie used the Halloween Postage stamp set to create this spooky bookmark.  

First, she created a mixed media background using distress inks on plain, white cardstock.  She stamped the spider web image and some sentiments from Halloween Postage and embossed them in gold.  She filled in the background by stamping the small, solid spider from the set in black.


For her focal image, she stamped the larger spider from Halloween Postage, colored it and fussy-cut it.  She stamped a sentiment from the set, trimmed it and added it to the bookmark.


She backed the panel with a patterned paper from her stash and finished with some colorful yarns and ribbons.


Thank you, Vyvie, for this fun inspiration!

To see more of Vyvie's work, please visit her on Instagram.


31 Nights of Halloween - Night 26 - Special Guest Jennifer Snyder


Good evening, Whimsy friends!  
You are in for a real treat tonight as welcome back the inspiring Jennifer Snyder to the blog!

Today I am thrilled to be a special guest blogger for Whimsy Stamps for their 31 Nights of Halloween Celebration on their blog.  You can find all the spooktacular fun on their blog, right here.  

What can be more spooky this time of year than a grave yard?!  I gathered some goodies from Whimsy Stamps and set to work on a 3D home decor graveyard.

  Scroll, down for DIY instructions. 


Whimsy Stamps is more than stamps.  They have an amazing selection of unique dies which were used to help make this decor piece today.  

The gravestones, cats, fencing and accessories were created using The Build-a-Graveyard die set designed by Deb Davis from Amped2Stamp.  


Instructions for the DIY Graveyard

Here are the finished 3D gravestones 

The sentiments and creepy cobwebs on the gravestones were from the two stamp sets below: 


Instructions for DIY Crypt (Houses)


Here are more images of the finished crypts and stones.  Enjoy!  I know I sure did.  


Thanks so much for stopping here to enjoy the Whimsy Stamps 31 Nights of Halloween Celebration.  You can find all the spooktacular fun on their blog, right here.  
You can also find more inspirational pieces using #whimsystamps and #whimsystampshalloween.

Wow!  Thank you, Jennifer, for this awesome inspiration!  
To see more of Jennifer's work, be sure to visit her on her blog and Instagram 

31 Nights of Halloween - Night 25 - Special Video Guests CaCa Crafts by Erica


Welcome back, Whimsy friends, to the 25th night of the annual Halloween Celebration! We hope you are enjoying the nightly haunts here on the blog. Tonight we are haunted by Erica from CaCaCraft by Erica.


One of Whimsy Stamps' "too cute to spook" Fuzzy Spiders is appearing on Erica's Youtube Channel.
Erica's ink blended background has that little creepy crawly jumping right off her card! Want to know how she did and what she used? Then join her on YouTube for all details. 

Want to know how Erica created that awesome ink blended background? Then click here to watch her video tutorial. 


Thanks for helping us celebrate the 31 Nights of Halloween!