Showing posts with label Cathy Arenzana. Show all posts

PUMPKINS ON PARADE VIDEO HOP AND GIVEAWAY


 Welcome, Whimsy friends! Do you know every month, the Creative Video Team hosts a Hop and Giveaway? The hop always starts on the Whimsy Stamps YouTube Channel and typically has five to six stops along the hop. We feature one product during the hop, which allows us to share our take on that product, which means lots of inspiration for you! 

I hope you'll hop along with us. 


Here are a few of the projects being shared this weekend. 

Creative Team Member Cathy from the Cathy Arenzana YouTube Channel shares several projects throughout her video including this spooktacular spin using the Build A Pumpkin Batch Die Set. Be sure to hop along and check out her other projects. 


 During her tutorial, creative Team Member Dawn from the D Pauley Designs YouTube Channel shares this sweet Hello Punkin Fall card. 


Creative Team Member Lisa from Card Making with Lisa Mensing shares how she created a Couture Pumpkin. 


As always, thank you for joining us!

FEATURED PRODUCT 

BUILD A PUMPKIN DIE SET


Tuesday Tutorial with Cathy Arenzana


Oh, hi! Cathy here and today I'm sharing a slimline card using the new 6x6 Bandana Paper Pack, along with a few other goodies. I don't know about you . . .but I am loving all the farm goodies from the latest release!

Anywhoooo . . on to how I created this card. I started with a piece of white cardstock that measures 2.25" x 6.25" so I could stamp the Scratchy Plaid Background stamp onto it. Of course, my piece of cardstock is longer than the stamp, so to get around that, I put my cardstock on the stamp before I inked it up and made a mark where the raised stamp ends.

Then I inked up the stamp with black ink and placed my cardstock on the stamp. To make sure I got a really good transfer of ink, I put a piece of scratch paper on top and rubbed really well.

Then to stamp the little bit at the bottom that was hanging off the bottom of the stamp, I re-inked the stamp and moved my cardstock to the top. I made sure to line up my pen mark with the very top of where the raised part of the stamp begins.


I didn't get the stamp lined up perfectly, but that's okay because it'll barely be noticeable
by the time I'm done.


Next, I cut a piece of patterned paper from the Bandana Paper Pack. . .Pink for me, please! Because a pink bandana and a bunch of birthday cows go together like peanut butter and jelly!

Well. . . actually, I cut two pieces to make it work for my slimline card. The first piece is cut to 3" x 6" and the second piece is cut to 3" x 2". I also cut a piece of black cardstock to 3.25" x 8.25" so I could have a little border around the bandana paper.


Next, I colored up the super cute cows from the Cow Party Stamp Set and then cut them down so I could adhere them to black cardstock so there would be a small border around them, too.


Copics used:

Nose: E04, E11, E00, E000

Body: W2, E41, E40

Spots: YR24, BV29, BV25

Horns: E43, E42

Hooves: YR24, BV29, C5, C3

Balloon: YG25, YG23, YG01

Party Hats: YG25, YG23, YG01, RV34, R83, RV11

Cake: Y21, Y23

Frosting: RV34, R83, RV 11

Candles: YG23, YG01, YR04, Y08

Background: BG0000, YG17, YG03


To put my card together, I adhered the Scratchy Plaid piece to a piece of black cardstock that measures 2.5" x 6.5".

I adhered the Bandana paper to the black cardstock and then adhered the Scratchy Plaid background on top, making sure it was centered.

Next I adhered the cows to the black squares and added some foam squares to the back of that and adhered it to the Scratchy Plaid panel.  I offset them from center just a little bit.

Then I adhered the whole panel to the front of a white notecard that measures 3.5" x 8.5" and that finishes up my card!


Thanks for stopping by today!


Supplies used:


Tuesday Tutorial with Cathy


 Oh, hi! Cathy here and I'm super excited about the new Slimline Cloud Die from the new March Release. The minute I saw it, I knew that I had to have rainbow clouds, and what goes better with rainbow clouds than super sweet unicorns?

I started out by cutting a piece of white card stock to 3.75" x 8.5" and then I did some ink blending with a rainbow of colors. I did want the clouds to be more pastel, so I used pink, peach, yellow, mint green, and a light aqua ink to do my blending.

After I was done with the ink blending, I ran that panel through my die-cutting machine with the fabulous Slimline Cloud Die. I also die cut a few clouds using the smaller dies that come with the Slimline Cloud Die from white card stock.


Next, I used a glitter pen to add a whole bunch of shimmer to the die-cut frame and clouds. I adhered the small white clouds to the back side of the slimline die-cut and then adhered that to a light blue card base that measures 3.5" x 8.5".

I stamped the super sweet unicorns from the Unicorn Wishes stamp set onto super smooth card stock and did some very simple coloring with my Copic markers. I cut out each of the unicorns and adhered them on the front of the card. To finish it up, I had to add even more sparkle, so I used my glitter pen on their horns and wings and Viola! All done!

Thanks for visiting today!

Copics used: R83, R81, Y26, Y28, BG11, BG10, BG0000, C3, C1, C7, BV25, BV23


31 Nights of Halloween - Night 18


Oh, hi! Cathy here and I'm so excited to be taking part in the annual 31 Nights of Halloween celebration here on the Whimsy blog.  You have a several chances to win awesome prizes throughout the month. Scroll to the bottom of this post to see how to play and win.

I created a slimline shaker card using the super awesome Wobbly Windows Slimline die and paired it up with the Spooks and Spells and You're My Boo stamp sets.


I started out by arranging some of the smaller sentiment stamps from the You're My Boo stamp set on to an acrylic block. Next I stamped them onto a piece of orange card stock with VersaMark ink and added Detail White Embossing Powder. After I heat set the embossing powder and gave a chance to cool off, I ran that panel through my die-cutting machine with the Wobbly Windows Die. While I was at it, I die cut it from a piece of black card stock, too.

I adhered the orange card stock on top of the black card stock, but made sure to off-set it ever so slightly  so there would be a little bit of the black card stock showing along the top, the left side, and the windows.


Next I adhered a piece of acetate on the back of the Wobbly Windows die-cut, and then added a whole bunch of foam tape, making sure there were no gaps in the foam tape I put around the windows. I added in some sequins and then adhered another piece of acetate on top. That way, I didn't have to worry about my sequins flying all over the place when I adhered that panel to the front of my card base.

Speaking of card bases. . . my card base measures 3.5" x 8.5". I adhered a piece of light purple card stock that is cut just slightly smaller to the front of my card base, then I added my shaker window on top of that.

Now that my card base is done, I moved on to stamping and coloring the ever so cute images from the Spooks & Spells stamp set.

I stamped the images using black ink and then colored them up with my Copic Markers. After I was done coloring, I cut out the images and added them to the front of my card. I added a little bit of sparkle to the spider web and the green potion that is bubbling out of the cauldron,

To finish it up, I added some . . . okay . . . a whole lot of purple sequins just for fun.

Click here for all the details for your chance to win the $300 in prizes that will be given away throughout the month!


Our July Digital Guest Designer and Another Fabulous Digital Team Tutorial!


Cathy Arenzana
The lovely Cathy Arenzana agreed to come
moonlighting with us over on the Digital Design Team
for the month of July. You will of course know Cathy from the Video Team!
Cathy did a wonderful job of showcasing some of our July release and 
I am so happy to share all of her gorgeous creations with you now.
Click through to her blog via the images for the full details.


Cathy created the sweetest card with this fabulous image Sherbert
from our Pollycraft Collection, combining it with the
perfect paper from our Licorice Paper Pad.


This super cute image Dino T Rex is by our lovely Crissy Armstrong and Cathy has created
the cutest card with this fab image. The fun sentiment is from the Cow Party Set and the papers are
 from the Giraffe Paper Pad. The balloons from the Happy Everything set finish this card off a treat!


Cathy's final fabulous creation used the super cute Dustin Pike image Gnome Fishing.
Cathy paired it with fab paper from the Giraffe Paper Pad and a lovely Wonky Stitched Die frame.


Thanks Cathy for sharing your wonderful talents with us,
your creations are all gorgeous and we look forward to seeing more of
your gorgeous creations over on the Whimsy Video Team.


Now it's time to share another fabulous


The lovely Lisabeth from our Digital Design Team has created an utterly fabulous tutorial
for us today and I'm especially excited, as it's her first tutorial sharing her talent with pencils!

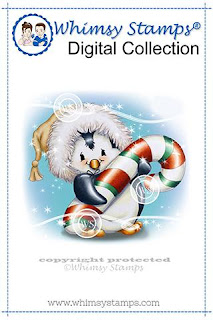
Penguin Candy Cane


To follow along with Lisabeth's amazing colouring, just click on the video link below.
Put on your favourite music, grab your pencils and if you don't own this sweet Rubber Image,
you can grab it in the Digital Version, for instant download, no need to wait!
Thumbnail links to both versions of the image below.


Prismacolor Pencils Used:
White: PC938
Grey (cold): PC1059, PC1060, PC1061
Orange: PC1003, PC118, PC122, PC947
Grey (warm): PC1072, PC1074, PC1076
Purple: PC1026, PC956, PC1008, PC996
Black: PC1063, PC1065, PC1067, PC935
Blue: PC1087, PC1024, PC1025, PC1101, PC901


I just find Lisabeth's colouring utterly mesmerising!
If you enjoy the tutorial be sure to leave her a comment on her YouTube channel
or here on our Inspiration blog. It's always so nice to read your comments!


Here is Lisabeth's gorgeous finished creation with this sweet Crissy Armstrong image.


I just love this finished design, the richness of these colours
against the kraft card background, the colours so totally POP!

 Huge thanks to our amazing Digital Diva Lisabeth Vefall for this fabulous Digital Tutorial!
You can read all about Lisabeth's creative journey with this tutorial
on her personal blog which is linked via her image below.


We hope you will enjoy creating along with Lisabeth's awesome tutorial and remember
to share your creation if you give this a go after watching her fabulous video.
We'd love for you to share it in our Facebook Group, so we can join the fun.
You can also tag Lisabeth there, to ask any questions you may have.

We will of course be back again next month with another fabulous Digital Team Tutorial!
So be sure you stop back then, there's always so much to see and inspiration to be had
here on the Whimsy Stamps Inspiration Blog. Be sure to check out all our current
gorgeous Digital Releases too, via the banner below.


The Digital Divas will be back next with our August Release,
I know right?! August!! It's approaching fast and we're excited to share
all the joys and goodies Whimsy has for you in August very soon.
Have a wonderful week and happy creating xoxo