Showing posts with label Penguin. Show all posts

Penguin Gardener - special guest - Pamela Schumacher


Hello everyone!

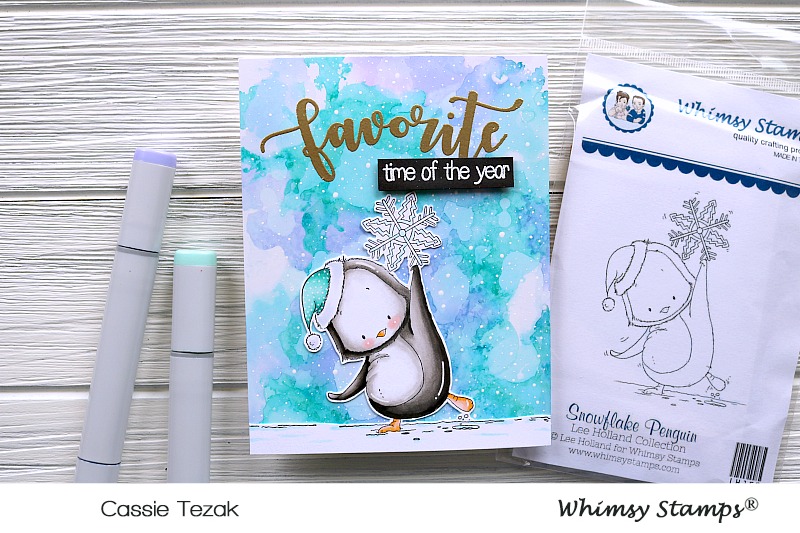
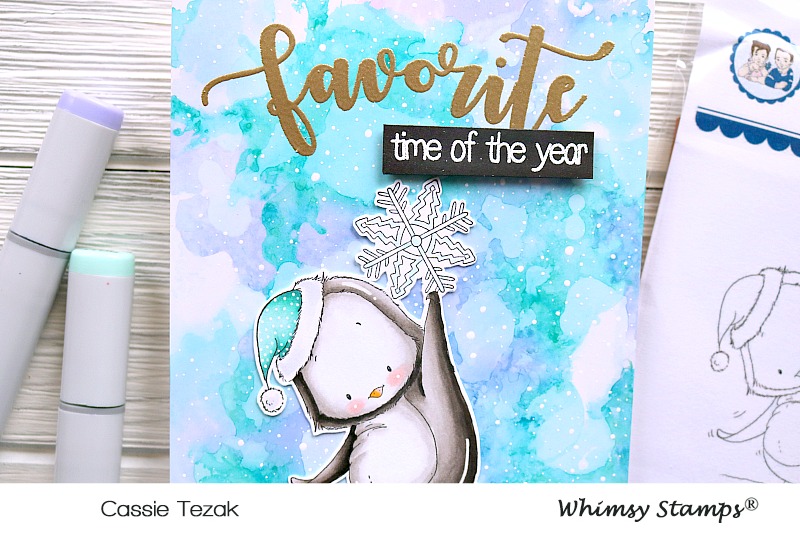
Penguins...I LOVE penguins! I would own one if I could! I love everything about them...they are beyond adorable, make the cutest little noises, the fact that they are amazing swimmers...but the cutest thing ever is the way they WADDLE. I confess...I just can't resist them!

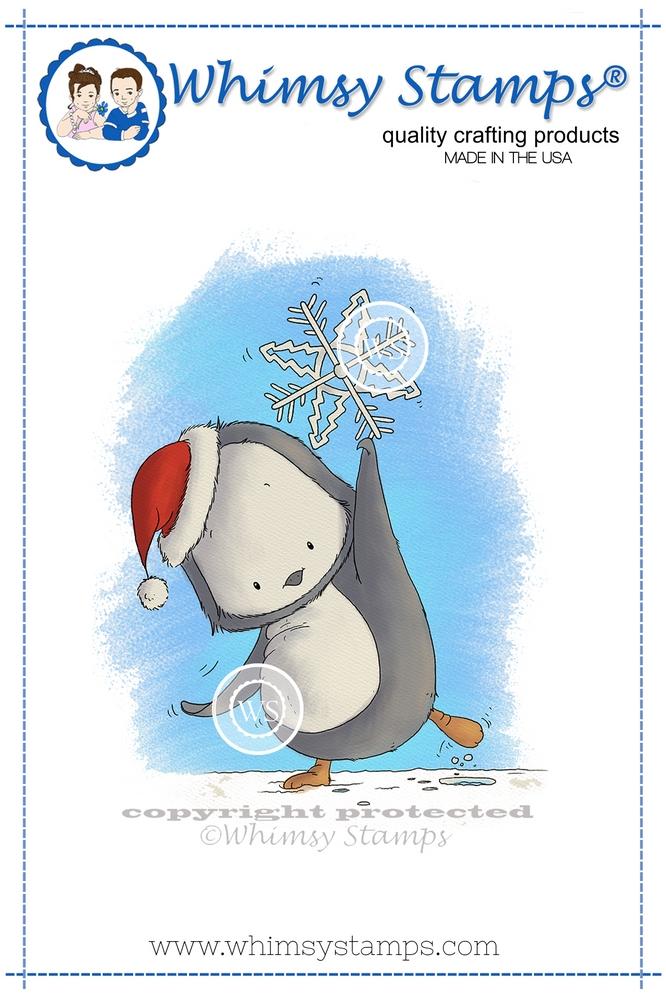
So, of course I just had to choose a penguin for my guest design team project for Whimsy Stamps. This handsome little dude is from the Penguin Gardener clear stamp set.

Penguin Gardener

~Copics~
Penguin: White-YR30/E40/BV20 Black: W8/7/5/0
Cheeks: R30/00/CB Feet: YR27/24/23/16/15/12
Flower: RV29/25/23/21 Greens: YG17/25/03/01/G94
Hat: E44/43/42/41/40-BG23/11/10/BV20

Penguin Gardener1

I wanted the image to be die cut square, but I only had rectangle dies, so I made it work. I drew pencil lines where the square edges would be, cut out only half of the image...then carefully adjusted the die so all the stitches would line up and turned it around and cut only the other half. Just be careful that you only send it through halfway each time.

Penguin Gardener2

The gorgeous dies are also from Whimsy Stamps.

Thanks so much for joining me today!

Until next time ~ Pam xx

Whimsy Stamps ~ Penguin Gardener Clear Set
Whimsy Stamps ~ Notched Rectangle Die Set
Whimsy Stamps ~ Leaf Foliage 2 Die Set

Penguin Gardener Clear Set Notched Rectangle Die Set Leaf Foliage 2 Die Set

Penguin with Star - special guest - Kathy Tanner

Hi, it's Kathy here with my last Guest Design Team card for Whimsy Stamps.
I have really loved working with Whimsy again!!!
Such awesome products to play with and such awesome people to work with too :)

For my last card I chose to use this super adorable stamp by Lee Holland called Penguin With Star.


I think this penguin is a soft, fluffy one, perhaps he's just a chick?  
So I decided to colour him a soft warm grey.
I used Copics to colour the penguin and tree and cut them out.

Then I created my background.
I used Distress Inks and sponged on some Shaded Lilac, Peacock Feathers, Faded Jeans and Black Soot,  Then I splashed some water on top.

I used some Ranger Texture Paste with the Star Dangle Stencil to create the beautiful stars and I added some extra dots of "snow" with a gel pen.

I added a little Wink of Stella to the star the penguin is holding.

For the snowy ground I just tore some strips of white card which I think give a nice soft snow effect.

Copics Used :

R 22, 24, 27
YR 14, 16, 18
Y 15
B 0000
W 00, 1, 3, 5
G 21, 24, 82
YG 13
E 31, 37, 39


It is extremely rare for me not to use a sentiment on a card but I was just happy with the way this card looked without one.

This little penguin is just so sweet and I loved colouring him.
He made me realise that I need some more Lee Holland stamps :)

Thanks for dropping by

Kathy


Winter Wishes Box Card - special guest - Rachel Alvarado

Hello friends!  I'm back today to share my third guest post this month for Whimsy Stamps.  I've greatly enjoyed playing with their super cute stamps and had a lot of fun creating a 3D "Winter Wishes" Box Card to share with you.


For this card, I used the adorable penguins from the "Penguins Winter Adventure" Stamp Set and combined them with some accessories from the "Oh What Fun" Stamp Set.  I love the little North Pole sign sticking up in the back of the scene!  I stamped all of my images with Copic friendly Black Ink, colored with Copic Sketch Markers and then cut them out.


To create the base (box portion) of my card, I like to refer to THIS tutorial.  I do change the measurements slightly (mine base is not as tall) but you can design yours however you like.  I created my own candy-cane striped patterned paper for the sides of the box using the Brushed Stripes Background Rubber Cling Stamp with Red Ink and layered it with some pieces of Kraft Card Stock.


For the blue sky background, I blended some Tumbled Glass, Salty Ocean, and Blueprint Sketch Distress Inks and then splattered this panel with some white paint to resemble snow.


I created a few stitched snowy hills by diecutting some small pieces of white card stock with the Stitched Border Die Trio.  Lastly, I heat embossed my sentiment with Super Fine Detail White Embossing Powder onto a small strip of black card stock.

Whimsy Stamps Penguins Winter Adventure


Whimsy Stamps Oh What Fun Stamp Set


Brushed Stripes Rubber Cling Background Stamp


I hope you enjoyed my card today!  You can check out the other super cute stamps and dies that Whimsy Stamps has to offer HERE.
Whimsy Stamps

Thanks so much for dropping by!  If you liked this card and want some more crafty inspiration, don't forget to check out my INSTAGRAM feed!

Wishing you all a lovely day and happy card making!

♥ Rachel

Penguin Beach Chair - special guest - Kathy Tanner

Hi :)  It's Kathy here and I'm sharing a Christmas card with a difference today.

My daughter loves to give her teachers Christmas cards with a heartfelt message inside

So I wanted a card for a teacher that said "Merry Christmas, Thanks for everything and Have a great holiday"  all rolled into one.

When I saw Crissy Armstrong's stamp called Penguin Beach Chair, I knew it would be absolutely perfect!!!

I do love snow on Christmas cards, it looks so pretty doesn't it?!  But we don't have snow in Tassie so it's great to be able to make a warm and sunny Christmas card.  Hopefully her teacher gets to laze around in the sunshine like this for the entire holidays.  I'm sure they deserve it  :)


I coloured the cute penguin with Copics and I also used them to make a very simple background.

 Copics used :

E 11, 13, 31, 41, 42, 43, 55
W 00, 1, 3, 5, 7, 9
C 5, 7
BG 000, 09, 10
B 93, 95
R 000, 27,29, 30, 59
Y 15, 26
YR 14. 16. 18


I thought the word "Cheers" was a great sentiment to use with this penguin.
So I used the Bold ABC Die to cut out the letters from white card.
It looks great on this clean and simple card and doesn't detract from the adorable penguin.

Thanks for dropping by today :)

Kathy

You're My Favorite Snowflake Penguin - Special Guest - Cassie Tezak

IMG_2067 


I'm back to share my last post with Whimsy Stamps as a guest designer. It's been so fun working with Whimsy and being able to use their awesome products! I can't believe it's over already!! Today I'm jumping seasons and sharing a winter card using some of there awesome products. Let's take a look!

I just love this penguin stamp called Snowflake Penguin. It had been such a long time since I'd used red rubber stamps prior to working with Whimsy Stamps, and it was so great to be able to use them again! They stamp like a dream. I colored him in with my Copic markers. Because I wanted the ground to extend past where the actual stamp went I used my Copic multiliner to draw in some more snow/ground so that it would cover the width of my card.

IMG_2068
I fussy cut the little guy out and set him aside. To create my background I used some purple and blue alcohol inks to create this arctic looking sky. I love the way it turned out! I heat embossed the word Favorite from the You're My Favorite stamp set with gold embossing powder at the top of the alcohol ink piece. I love this scripty font.

IMG_2071
To finish the sentiment I stamped "time of the year" with VersaMark ink as well and heat embossed white embossing powder over top. I trimmed that down and added it to the card with foam tape. I adhered my fussy cut penguin over the alcohol panel and, of course, I had to add some white gel pen accents.

And that is it for my last post as a Whimsy Stamp guest designer! Like I said, I can't believe this month is over! It was so fun working with these adorable products, and I'm thankful to have been given the opportunity to do so! Thanks so much for stopping by today, and I hope to see you again soon!!

snowflake_penguin_color_display_1024x1024 Youre_My_Favorite_store_display_1024x1024

Penguin Gardener - Special Guest - Michele Kovack

Hope you all had a great weekend! I am back with a trio of cards using this super cute set from Whimsy Stamps.  The set is appropriately called, Penguin Gardener.  I stamped it in a light grey ink and used my Copic markers to color them.  I love the look of no line coloring, as to me it gives a story book look.


I love the look of round cards for a change of pace!  I used various Spellbinders dies, circle, pinking shear, and scalloped.   


Each sentiment was stamped in a slightly different way.  For the card below I took the sentiment and shaped it on the acrylic block to give it a curve.  This is one of the many reasons I love working with clear stamps! It is easier to manipulate the stamps!


A few sequins, a little flower, and the cards were complete!

Penguin Gardener Clear Stamps
Thank you so much for stopping by today!

Fall in Love!


Hi to everyone!  Laine here with a cute wall hanging featuring the sweet digital stamp Penguin Fun in Fall by Crissy.  Don't you just love the fall season and walking through those crisp and crunchy autumn leaves.  This will really brighten my craft room wall as the days shorten!


The image was printed onto stamping card and coloured with a mixture of Copic and Spectrum Noir markers.  Extra detail and depth was added with Faber Castell Polychromos pencils.  Distress Inks provide the sky.  Papers from the Aqua Breeze and Rainbow Polk Dots Digital paper collections have been printed, cut to size and mounted onto mats.  Die cut,stamped and punched detail have been added.  Burlap ribbon and lace are from my stash.


Join us at Whimsy Stamps and Inspiration on Facebook for creative inspiration from the team. We would love you to share your own Whimsy Stamps creations!  


Further details for this project are on my blog.   Until next time, happy crafting everyone!


Falling For You ~ Autumn Wonderland

Hey there lovely Whimsy fans. I have a treat to share with you. Have you seen the AMAZING new release yet? There are SO many gorgeous creations over on our Whimsy Stamps Facebook page showcasing all the gorgeous new images. But I'd like to share a wee card I made with one of my favourite images from the current release. This lil' cutie is called 'Penguin Fun in Fall' and he has a little bit of my heart! He's such a cutie! He has of course been penned by the wonderfully talented Crissy Armstrong and you can find a whole bunch more of her enchanting images 'here' in the Whimsy Stamps Store.


I've coloured this cutie with my Copic Markers. Did you know they are for sale now in the Whimsy Stamps store?! So handy, you can just add what you need to your order when you're buying your gorgeous images! Whimsy also stocks inks, glues and loads of other really handy craft items, so be sure to check those out 'here'. I coloured up this cutie to be wearing a Gryffindor scarf. This was for my wee boy who is nutty about all things Harry Potter right now. 


I kept the design of the card very simple, I just added a subtle blue sky to hint at a clear crisp Autumn day and roughed up the edges before mounting the image panel on foam for a bit of dimension. I used the most delish digital paper for this creation by Whimsy's own Denise Lynn. It's from the set called Floral Beauty. I just LOVE the fabulous Autumnal browns in this set. I wanted a simple finish for this card, so just added some hand-stitching in a cotton thread of a similar hue.


I used kraft card for my card base and it was slightly too pale in colour to contrast well with the digital paper, so I wanted to darken it just a little to really set up the foundation for this layout. I used a piece of card when I was inking the edges with Distress Ink to keep my surface clear of ink and when I'd finished I had the fab idea of cutting the sentiment out of this 'waste' paper. I love how this came out, with that slight ombré touch to the ink. I simply glued this down straight onto the image panel, half on half off the page, so some actually floats above the base paper, it's quite cool in reality. I so loved this Autumnal Wonderland depicted in this sweet image, so I think the Wonderland die was a really fun fit for this creation. This is of course from the Wonderland Word Die set from Whimsy. Thanks for stopping by today, be sure to check out the full range of Whimsy products and their awesome latest release over in the Whimsy Stamps store. I'll see you again soon for more Whimsy Wonderland fun! Hugs xoxo


Dashing Through The Snow ~ Kinetic Card Fun

Hey there Whimsy Stamps fans. I'm here with a super cute and very fun kinetic creation today. I've used a whopping 7 different Whimsy Stamps items in this creation and had such a blast making it. I've even taken a little video of the kinetic element of this creation in action. You can click the video below for a peek at that.


I have a step by step tutorial on how I created this Kinetic card using the fabulous Whimsy Stamps Slip 'n' Slide  Die Set, so head over there to Crafty Kiwi Mama for a break down of this process.


This adorable Whimsy Stamps penguin image is by Crissy Armstrong and is called Penguin Skier 2. I've coloured him with my Copic Markers. I added a tiny bit of Wink of Stella to his ski goggles for a little bit of sheen and that was him done. I love his yellow scarf and hat. I thought it was such a fun joyful colour for this creation. I think he's utterly adorable!


I created a snowbank which I'd embossed with two different folders for a bit of fun and then added a little cluster of trees at the top of the snowbank and one down the bottom. I used the cute little tree die from the Camper's Road Trip die set. It's only available now in the June Bonus Bundle, but if you're keen on that and the Slip 'n' Slide die set too, it's a steal, as they're both in this Super Saver set.


I've used two lovely dies to create the sentiment. The Christmas Large Word Die and one of the words from the Wonderland Word Die Set. I cut them from silver glitter cardstock for a bit of bling and sparkle. I adhered them to the paper with Zig Glue Pen. I printed the beautiful Winter's Magic Blue Digital Papers by Crissy Armstrong on 250gsm cardstock, so it was heavy enough to carry the slider mechanism without buckling. The final touch was to add a snowflake from the Snowflake Dies by Nina-Marie Trapani. I added Wink of Stella to it, but felt last minute it needed a little something else, so I added a tiny sparkly gem to the centre.


The thumbnails at the end of this post will take you straight through to the store for a closer peek at the Whimsy Stamps elements I used for this card. I hope you enjoyed my kinetic creation, if you want a closer look at the full process of how this kinetic card was created, head to my blog.


Do pop over to the Whimsy Stamps Facebook Group where there is a constant stream of lovely inspiration from the Wider Whimsy Design Team. They're such a talented team, and you're sure to be inspired by their gorgeous creations. I'll be back again next month with another Whimsy Stamps crafty adventure. Hugs and happy crafting xoxo