
Showing posts with label Dina Kowal. Show all posts

Paper Door - Stinkerbell part 2 - Special Guest Dina Kowal & GIVEAWAY!

Just wanted to share a couple more projects I made using the Paper Door kit I shared about yesterday! Keep reading for another chance to win a $15 gift certificate from Whimsy Stamps.


I shared this stamp image yesterday, but for this card I used black ink for the outline and colored it in using colored pencils for a completely different look. I used the stencil and gold ink from the kit to add some splashy fireworks to the background, and splattered some of the same ink around the wand for even more sparkle and kick.

This card was so much fun to make - this is done with the individual smaller stamp elements from the set. I started off with the images in green - I positioned the stamp, inked and stamped, then rotated the panel 90 degrees and stamped again, and repeated that around the panel... since the panel is a square, it stamped in the same position on each side. I repositioned the stamp between my first two impressions, and did another round of stamping to complete the ring. I followed the same process for the star image, and then added the little 'poofs' by hand. So fun! I'll have a couple more ideas with this technique coming up next week. Here's a closer look!


Like I mentioned yesterday, I have one $15 gift certificate to give away! For an extra chance to win, please visit the Paper Door info page, then visit my Dina Kowal Creative blog and tell me about your favorite feature of these awesome new kits! Make sure I have a way to contact you as well! I will draw and post a winner Monday evening (March 19) at 8:00 Central time!



**PAPER DOOR - March 2018 RESERVATION

Thanks for visiting me today!
Thanks for stopping by!

Paper Door - Stinkerbell part 1 - Special Guest Dina Kowal & GIVEAWAY!

 
Ready for something new and fun? Whimsy Stamps is introducing Paper Door this month! These are monthly product kits full of exclusive and exquisite themed crafty goodies - each month you'll get a chance (between the 10th and 25th) to preview the contents, and you'll reserve only the kits you want - no subscriptions and no minimums. Here's a look at the goodies available in the March kit!


Poof! There is so much sparkle and glitz in there, and the paper selection is absolutely exquisite - I almost hated to cut into some of them! Here are a couple of the cards I made, and I'll share 2 more tomorrow. 


This has to be my favorite of the cards I made from the kit - I stamped the fairy in a light ink and colored her in with colored pencils. The sparkles around her wand are clear embossed, and I used the gold Delicata ink from the kit to stencil in the cloudy background. I love that gold paper - I embossed it with a Darice folder for some extra texture.


For my second card I stamped the other fairy image onto one of the textured papers from the kit, and colored her in with Copic markers, adding a little Wink of Stella for some sparkle on her wings. Not only is the cardstock textured, it also has a coating on it, which made the Copic blending very easy. I used clear powder to emboss the Lattice Background stamp on the curved panel for a little extra something in the background, and that curve was cut with one of the Stitched Border Dies. I love all the little mix and match sentiments in this set, too.

Not only do I get to tell you about the Paper Door kit, I get to give a $15 gift certificate to a lucky winner! For a chance to win, please pop over to the Whimsy Stamps store and take a peek at their new March release, then visit my Dina Kowal Creative blog and tell me all about your favorite stamp or set in the batch! Make sure I have a way to contact you as well! For another chance to win, check back tomorrow too! I will draw and post a winner Monday evening (March 19) at 8:00 Central time on my blog!


Thanks for visiting me today!
Thanks for stopping by!

**PAPER DOOR - March 2018 RESERVATION Lattice Background Stitched Border Die Trio

Fill my Heart - Special Guest - Dina Kowal

Hi all, Dina here with a guest post for Whimsy Stamps and I'm also combining my guest spot with hosting the MIX-ability challenge over at Splitcoast Stampers - did you know we've been doing these mixed media challenges for over 5 years already?  Thanks to Whimsy Stamps for letting me share in both places.


My challenge is to use patterned paper as the base for your focal panel, and create a mixed media project. The paper I used is from Whimsy Stamps' Christmas Cheer paper pack - I stamped right onto it with one of the images from the Fill My Heart clear set:

Fill My Heart clear set
I drew a light horizontal line across the paper, then used some QoR watercolor paint to sketch in some grass around the dog. When that was dry I used colored pencils to add some shading on and around the dog, and to add details to the scene.


My card is a tri-fold card... the base is 4-1/4" x 11", scored at 4-1/4", and 8-1/2", and then cut on the flap with a Stitched Border Die. To keep it closed, I attached a button with a brad so it would just overlap the edge of the flap when in place....


 but release the flap when it was rotated down.


Here's one more card I made using the same techniques, the Fill My Heart set (what a great pet set), and some retired Whimsy products.


Hope you have a wonderful weekend! Thanks for letting me share with you today!

Thanks for stopping by!

Fishin' Friends - Special Guest - Dina Kowal

Dina Kowal here happily guest designing for Whimsy Stamps today.  I needed to just sit and watercolor today, so I pulled out this Fishin' Friends image to work with. I filled up my watercolor palette last night so it was all fresh and ready to go.

When the watercolor was dry, I used colored pencils to add some fine shading and details, and then a little gesso to add highlights. The sentiment I used is from the beautiful Fill My Heart set - I thought it was a sweet addition to this tender scene. I used the largest of the Hand Stitched Nested Rectangles dies to cut the panel to an A2 size.


I finished up a portrait this weekend of a golden retriever who loved the water - that fits well with my card today. She was fresh out of the river after a swim when the photo was taken, and it was fun sketching in all her curls of wet fur. If you'd like to see the progression of her portrait, you can click over to my business site here


That's all I know - I hope you're having a great week and thanks for having me Whimsy!

Thanks for stopping by!

Fishin' Friends Fill My Heart Hand Stitched Nested Rectangles

12 Days of Christmas Day 9 GIVEAWAY - special guest Dina Kowal - Winter Wonderland


Whimsy Stamps is giving away a chance at a $10 Whimsy Stamps gift card with today's post!  All you need to do is pick your favorite Whimsy Stamps card (created by you or the Whimsy team) and post it on any social media.  Then come back here and add the link with the linky tool at the bottom of this post by 12/25/17 at 11:55pm.  The winner will be announced HERE on 12/27/17.  You can enter as many times as you'd like.

Dina here again welcoming you to Day 9 of the Whimsy Stamps 12 Days of Christmas blog celebration.  I'm happy to share with you today a tutorial and it's one that I know I'll be using throughout the year! It's called Shaving Cream Sparkle - it's a much more controlled shaving cream technique than the classic one done with reinkers.


I have this gorgeous scene builder set from Whimsy Stamps called Winter Wonderland - I started off by stamping the trees and deer on watercolor paper and embossing them in white. The embossing resisted the background technique, which was exactly what I hoped. I also cut a mask for the hill using a curved border die from the Stitched Border Trio set.


The background has several layers of inking, and then stamping and more embossing - I used a stamp from the Christmas Scene Builder set to add in the snowy effect, first with the purple Oxide ink and then with white embossing.


For a little more dimension, I added some raised dots in the snow - I actually did a little old-school dry embossing, using an embossing folder, stylus, and my light pad, just adding the dots to open areas. Remember the old days, with the templates and light boxes? Good times... and still a way to be selective in adding embossed designs to a panel.


Come over to the Falliday Fest Challenge Forum for all the details!  And be sure to stop back here on the Whimsy Blog for another special guest 12 Days of Christmas post too!


Thanks for stopping by!

Winter Wonderland Christmas Scene Builder  Stitched Border Die Trio

12 Days of Christmas Day 4 - special guest Dina Kowal - Penguin Gift


I'm so grateful to Whimsy Stamps for having me as a guest designer this month - it's been a lot of fun! And now for my first 12 Days of Christmas post...


I used a couple of Whimsy's adorable penguin stamps for the challenges over at Splitcoast - the first was for a color challenge (black, grey and peachy pink). I watercolored this little scene (Penguin Gift) using QoR watercolors (my favorite tube paints) and added in a few details with colored pencil.


I did some negative coloring, which is always fun - coloring "outside the lines" to create the snowy ground and the glow around the lamp.


My second card was done with similar techniques, but I used a Sakura Clear Glaze Pen to mask off the snowflake first - did you know the Glaze inks dry a little raised, and they're waterproof? They're perfect for masking off fine lines like these. I watercolored with the QoR paints again, creating a blocked background for this adorable little guy (Snowflake Penguin), then I added some falling snow using acrylic paint, dotted with a small stylus.


There are a couple of other Whimsy products on my card - the sentiment is from this great set, which is full of tiny and practical sayings:

Everyday Mini Sentiments

And the paper on my card base, which you can barely see except for a few snowflakes peeking out... is from this paper collection:

Winter Wishes 6x6 Designer Paper
If you like the color scheme there, you'll love the sparkly enamel dots that match - eep! 

That's all I know today - thanks again to Whimsy Stamps for having me, and thanks to you for visiting me today! Be sure to check back tomorrow for another 12 Days of Christmas special guest post!
Thanks for stopping by!

Penguin Gift Snowflake Penguin

Special Guest - Dina Kowal

Dina Kowal here with another guest spot for you today.  Before I get to my post I want to make sure that you all know about the Falliday Fest going on over at Splitcoast Stampers.  If not, head on over there and enter the challenges because Whimsy Stamps is one of the sponsors for prizes at the end of the fest.  And I'm sure you don't want to miss out on possible Whimsy Prizes do you?!

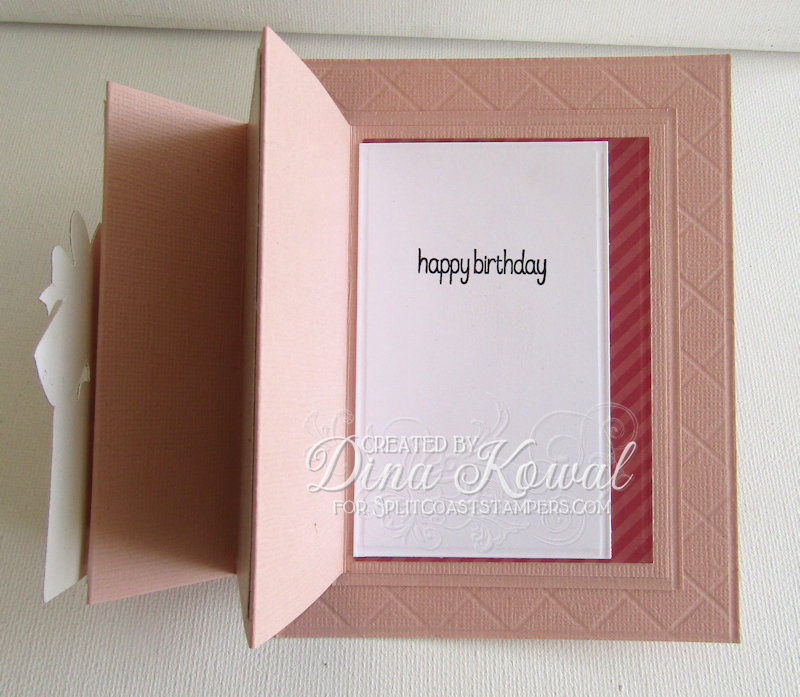
Okay so for today's tutorial I have a Panel Pull-Out Card - the base is a no-fold quarter sheet of cardstock, and the front panel folds in and out accordion style. Simple and fun!


The design of the card gives you 3 'front' panels to decorate - for my card front I've used the Puppy in Present stamp by Lee Holland, it might be fun to have some die cuts or other small birthday images peeking out from the other panels as well! I kept it simple here and just hid a sentiment on the third panel with some room for a handwritten greeting. 


The sentiment is from a really fun clear set from Whimsy - I love small greetings and this set is just full of practical ones.


Those smaller card panels are a great way to use up scraps too - that's one of my goals with these tutorials and challenges. 

Want to try the card yourself? Come over to the Falliday Fest Challenge Forum for all the details!


Thanks for stopping by!