Monday, April 29, 2019
Shake That Booty
Panda butts! Is there anything cuter? Well, yes, but panda butts are particularly cute, especially the ones in the new Whimsy Panda Butt set! I love them so much I was inspired to make 2 cards. Plus, I didn't want to waste my experimental background!
This is the first card I had made where I first experimented with bamboo placement. Really simple card with just a bit of sponging, the bamboo stamping and then coloring up a couple of the pandas.
With the second card I cut apart the first card's initial bamboo background experiment that I hadn't liked although it was perfect for using with the Peekaboo Windows 2 die. I used the Messy Mesh Background to make my own patterned paper on the card base.
Now tell me. Could anything be easier to color than pandas? Not a lot going on there palette wise, am I right?! And these sentiments are perfect for images--eeeeeeeeeeee!
Feel free to stop by my blog, Frankie Helps Craft, to see my other creations and for a full list of ingredients. You can also check out my Instagram.
Also, a reminder that the current Whimsy Challenge April Showers Bring May Flowers is ending soon. Won't you join in?!
Sunday, April 28, 2019
Butterfly advice...
Hello everyone,
I hope today is kind to you...
It's Sue here today and I have two cards to show you today made with a beautiful new release background stamp from our wonderful
To make this card I first blended Distress Inks over a piece of card. I used my favourite colour palette of Shaded Lilac, Worn Lipstick, Evergreen Bough and Scattered Straw. I sprinkled water over the design and dabbed it dry with papertowel
Then I stamped and heat embossed in white the
I then layered the design onto a piece of white card and added a white ribbon.
I completed the design by die cutting the
and adding a sentiment from the
You're Too Kind Clear Stamp Set which cut out with a
I used the same techniques to make my second card ...
I first blended Distress Inks over a piece of card. I used a different colour palette of
Wilted Violet, Cracked Pistachio, Faded Jeans
I sprinkled water over the design and dabbed it dry with papertowel
Then I stamped and heat embossed in silver the
I then layered the design onto a piece of silver glitter card.
I completed the design by die cutting the
and adding a sentiment from the
You're Too Kind Clear Stamp Set which cut out with a
The crafty possibilities with Jennifer Doves's beautiful Butterfly Background Stamp are endless - you could create so many different cards with it!
Thank you for popping by!
Be sure too have a look around our
Whimsy Inspirations Blog
to see all the wonderful Creative Team inspiration and then pop to
Whimsy Stamps
for some essential retail therapy!
Be sure too have a look around our
Whimsy Inspirations Blog
to see all the wonderful Creative Team inspiration and then pop to
Whimsy Stamps
for some essential retail therapy!
Friday, April 26, 2019
Have a Magical Birthday | Create Magic Clear Stamps
Hello everyone! It's Rachel here and I have a bright and colorful card to share with you today featuring the new Create Magic Clear Stamps Set! This set was so much fun to play with and makes for some truly amazing designs! (Affiliate links used.)
I wanted to try and create a magical scene with my wizard today and used some Distress Ink Blending for my background in order to accomplish this.
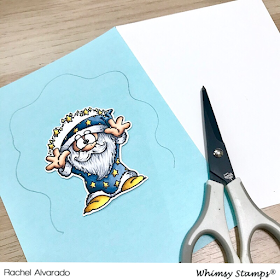
To start, I placed my image (for reference) onto a piece of masking paper. I then loosely drew the outline of the background that I wanted onto the masking sheet. Ideally, you should draw your background onto the white side of the masking sheet, but since my background was pretty symmetrical, I drew it on the blue side just to get a better picture to show you.
I cut out around my outline, making a window where I would blend my ink and then attached the masking sheet to my card base. I also used some tape and cardstock to mask the bottom portion of my card.
To get a bold background with Distress Inks can take some time and multiple layers. I slowly worked from the inside out, laying the lighter color to the darkest and blending as I went along. I used Twisted Citron, Stormy Sky, Faded Jeans, Chipped Sapphire, and Black Soot Distress Inks.
Once blended, I then splattered this image with some water. I let the water sit for a minute and then lightly blotted it dry with a paper towel. Lastly, to finish off the background, I then splattered it with some Opaque White Paint. I used some Warm Gray Copics (W00, W0, W1, W2, W4) to color the ground area and added some ground shadows where I would be placing my wizard.
I stamped my wizard with Memento Tuxedo Black Ink onto a sheet of Neenah Solar White 110lb Card Stock and colored him with Copics.
Blues: B91, B95, B97, B99
Skin: E0000, E000, E21, E11, E04
Yellow: Y02, Y08, Y13, Y15, E34
Whites/Beard: 0, C00, C1, C2, C4
Thanks so much for dropping by! You can check out this set and all of the Whimsy Stamps April Release HERE.
Create Magic Clear Stamp Set
Thanks so much for dropping by! You can check out this set and all of the Whimsy Stamps April Release HERE.
Create Magic Clear Stamp Set
Wednesday, April 24, 2019
~ Whimsy Stamps - Spring is in the Air ~
Hoppy Hump Day Everyone!
I have created a super fun spring shaker card using Whimsy Stamp's new Bunny Spring Squares Cling Stamp along with their new Peekaboo Windows 4 Die. This stamp is just not for Easter. It is the sweetest stamp to celebrate that spring has sprung! I decided to turn this card into a shaker card using the tiny circle cut outs as the shaker windows using fun spring colored baking sprinkles as the shaker bits. I just adore the tiny carrot die from the Build-a-Basket Die Set and thought they would make the perfect little border for this spring card. You know bunnies love their carrots! To make the flower border, I used the large flower die that also comes in the Build-a-Basket Die Set. The dies that come in this set are a must have!

The Bunny Spring Squares fit perfectly inside the openings of the Peekaboo Windows 4 Die. I love how the stitching around the squares still shows inside the die cut window. I think it gives it that extra special touch!
~ Whimsy Stamps ~
I have created a super fun spring shaker card using Whimsy Stamp's new Bunny Spring Squares Cling Stamp along with their new Peekaboo Windows 4 Die. This stamp is just not for Easter. It is the sweetest stamp to celebrate that spring has sprung! I decided to turn this card into a shaker card using the tiny circle cut outs as the shaker windows using fun spring colored baking sprinkles as the shaker bits. I just adore the tiny carrot die from the Build-a-Basket Die Set and thought they would make the perfect little border for this spring card. You know bunnies love their carrots! To make the flower border, I used the large flower die that also comes in the Build-a-Basket Die Set. The dies that come in this set are a must have!

The Bunny Spring Squares fit perfectly inside the openings of the Peekaboo Windows 4 Die. I love how the stitching around the squares still shows inside the die cut window. I think it gives it that extra special touch!
~ Whimsy Stamps ~
~ Copics ~
Bunny
W00 W0 W1 W3
R0000 R000 R00 R01
B0000 B000 B00
Flowers
V20 V22 V25
Y21 Y15 Y38 E13
Leaves
YG03 YG17 YG67
Cast Shadow
BV20
~ Misc. ~
Acetate
Baking Sprinkles
Happy Stamping!
Monday, April 22, 2019
Whimsy Stamps & WOW! Blog Hop Winner
Hello, Whimsy fans! We hope you enjoyed last week's collaboration with WOW! The inspiration from both design teams was absolutely amazing!
Thank you to everyone who left comments on the blog hops! The randomly-chosen winner of the $25 Whimsy Stamps gift certificate is Corinne from Ashlee McGregor's blog, who wrote.
Corinne13 April 2019 at 03:28
awesome background.. your tiger is colored so fabulous..
Hugs
Congratulations, Corinne! Please email whimsystamps@gmail.com to claim your prize, and be sure to include as your subject line "Winner of WOW hop".
Do you know about our current challenge? The theme is "April Showers Bring May Flowers", and there's a $20 prize up for grabs. You can find more information and some fabulous inspiration here. Come play along for a chance to win! You have until May 3rd at midnight EST to link up your creation. Below is some additional inspiration by Designer Toni featuring the adorable Bunny Buddies stamp set
Do you know about our current challenge? The theme is "April Showers Bring May Flowers", and there's a $20 prize up for grabs. You can find more information and some fabulous inspiration here. Come play along for a chance to win! You have until May 3rd at midnight EST to link up your creation. Below is some additional inspiration by Designer Toni featuring the adorable Bunny Buddies stamp set

Thanks for stopping by!
You are my Sunshine!
Hi crafty friends! Michele here! Hope you are having a wonderful day!
I am so happy that spring has finally decided to show up!
This new die set from Whimsy Stamps, Build-a-Garden is perfect and so much fun to play with.
I die cut each piece on water color paper and used watercolor markers. I wanted to add a bit of texture to the birdhouse so I stamped it with the Rain Drops Background stamp in Versamark. I heat embossed it in gold. I dragged the Versamark pad across the edges as well as on the flower pot for more interest.
The watering can was watercolored, Versamarked across the entire front of it, and embossed with a pearlized embossing powder. I love the pretty sheen it gives! I popped it up using Crafty Foam tape.
For the background I used the new Peekaboo Window Die and the 6x6 paper pack in Pretty Pastels, as my backdrop to all of this spring gorgeousness.
I decided this spring scene needed a butterfly so I added one using the Butterflies Fluttering stamp set.
The sentiment is from the Bunny Buddies set. It was stamped with Versamark on black paper and embossed in white.
I added a few hearts from the Sparklets Love Hearts and a few white dots using Nuvo Crystal drops in Simply White.
Thank you so much for stopping by!
Supplies:


