Thursday, December 27, 2018

More merry wishes

Hello from a frosty UK!  Hope you all had the most wonderful Christmas.
When I coloured the image for this card I coloured it twice (I’m all about making as many cards as I can at Christmas lol) so although the colours are the same I think using the dark red Nordic paper changed the image up a fair bit from the other card.  I also used white and gold paper flowers instead of the red flowers, the red paper sets them off beautifully.

bev-rochester-whimsy-merry-wishes-tls

I used one of the new digital Christmas Sentiments (which comes in black, red, gold and silver) and cut it into a banner.

christmas_sentiments_full_display_large

 
Merry Wishes was coloured with copic markers: Skin: E04, 11, 00, 000, R20; Hair: E27; Fur and skirt: W3, 1,0, 00; Red: R39, 37, 35, 32; Green: BG99, G28, 24, 21; Gold: Y28, YR23, Y13

I used watercolour paper and glitter paper to make the poinsettias (using the Lily Flower die set) and I used tiny gold jingle bells for the centres.  I used a little Christmas Light button that I bought here in the UK, Whimsy Stamps has very similar buttons here

bev-rochester-whimsy-merry-wishes-tls1

I absolutely slathered this card in glittery bling because …. XMAS!!

bev-rochester-whimsy-merry-wishes-tls2

Whimsy Stamps products used:

Merry_Wishes_Fairy_Color_dsiplay_large bev_christmas_sentiments_display_1024x1024 Lily_Flower_Die_Set_large Christmas_Branch_die_set_display_large Copic-Markers-1024x843
 glamor-dust bells light bulb buttons 

Wishing you all the very best for 2019, hope it’s your best year yet!

Sunday, December 23, 2018

Christmas Sprite - Special Guest - Heidi Jakobs


Christmas Sprite in three different mediums


Hi everyone, Heidi here, today I’m showing you my second project as a guest designer for Whimsy Stamps. In today’s project I would like to show you one gorgeous Christmas Sprite stamp coloured three times in three different mediums, so that you can pick and choose which one fits your supplies or style best!


For my first card I choose to colour the gorgeous “ChristmasSprite“ image using Copic Markers. You can use any alcohol markers you have of course. I stamped the image onto Copic friendly paper using Memento “Tuxedo Black“ ink and let her sit for a while, so that the ink can dry completely, before I started colouring.

Then I coloured the image using the following Copic colours: Y000, Y26, Y04, YR18, YR21, E000, R00, R01, W1, W3, R29, R39, E07, RV52, RV55, RV19, V17, E39, G40, YG17, YG67, YG97 and B0000. When the colouring was done I added back in some highlights using a white Gelly Roll Pen.
On the wings I added some “Diamond“ Stickles using a brush (wash the brush afterwards) for an extra magical look!


I choose for a round card base which I created by die cutting a circle shape from a square white linen textured card base (make sure that the part where the die is sticking out has the fold).
Then I die cut a slightly smaller circle shape from some matching orange coloured mirror card stock and then I die cut around the coloured image using an even smaller circle die.
On this last panel I stamped one of the sentiments from the “You’re My Jolly“ stamp set using the same black ink as before.

Now I can finish my card by adhering the coloured image on top of the orange circle using liquid glue and then adhering these combined layers onto the circle shaped card base using one millimetre thick foam tape.


For my second card I choose watercolour pencils as my colouring medium. I stamped the same  “Christmas Sprite“ image onto fairly smooth watercolour paper using Versafine “Onyx Black“ ink and let the ink dry. Then I used a combination of Caran d‘Ache Museum Aquarelle and Faber-Castell Albrecht Dürer watercolour pencils and an aquabrush to colour the image.
From the Caran d’Ache line I used the following colours: CA350, CA010, CA036, CA065, CA599, CA661, CA004, CA249, CA719, CA245 and CA049.
From the Faber Castell line I used the following colours: FC19, FC125, FC132, FC189 and FC137.
I also added some “Diamond“ Stickles to the wings in the same way as I did for the first card.

(inse

Next I die cut a square around the coloured image leaving enough room on the top to ad my sentiment. As my sentiment I choose a combination of words from the “Everyday Scripted Sentiments“ stamp set, those I stamped on the top part of the panel using the same black ink that I used before.

To finish this second card I die cut a slightly larger square from some matching olive green card stock. I adhered both square panels together using liquid glue and then adhered these combined panels to a crème coloured linen textured card base using one millimetre thick foam tape.


And for today’s final card I choose regular coloured pencils as my colouring medium, but I decided to work on Strathmore “Toned Tan“ paper, for a different look. I stamped the sprite image onto this paper using Versafine “Onyx Black“ and then coloured the image with a combination of Faber Castell Polychromos and Prismacolor Premier (for the skin parts) coloured pencils and one Caran d‘Ache Luminance coloured pencil.
For my highlights I used the White pencil from Caran d‘Ache.
From the Faber Castell line I used: 271, 108, 283, 173, 168, 171, 188, 135, 119 and 250.
From the Prismacolor line I used: Crème, Beige, Light Peach, Peach and Salmon Pink.
And for this card I used some “Star Dust“ Stickles for her wings.


When the colouring was done I die cut a circle shape around the image using the same procedure as with my first card. I also added the sentiment from the “You’re My Jolly“ stamp set. For my slightly larger mat I choose a yellow orangy circle shaped die cut panel and put the card together on a crème coloured linen textured card base.

And that’s it for today’s trio of Christmas Sprite cards. I’m curious what your favourite medium is to colour with?

Thank you for having me as a guest designer, I had a blast while creating these projects for you!
I wish you a creative day and a fabulous time with friends and family during the Holidays!

*NEW Christmas Sprite Rubber Cling Stamp  Everyday Scripted Sentiments Clear Stamps

Saturday, December 22, 2018

Christmas Snowman

Dorinda here with you today.
Only a few days left till Christmas and this will sadly be my last Christmas card of the year.
I've had such a blast creating with all the Holiday filled images.

For this card,
I've used a stamp from the Sylvia Zet line called 

Other Whimsy Stamps Products used:


I've always been a big fan of Sylvia Zet and took this opportunity to play with one of her Christmas images. 
I colored up Candle Light Rubber Cling and distressed the edges; adding a backing with distressed edges as well
I cut out a couple of the pines from Evergreen Trees Die Set and frosted them with Nuvo Crystal Drops in Simply White.
Then I added the gate from Kinetic Curved Hills Die Set to finish off my back scene.
I added some pine cones frosted with the Nuvo Crystal and a couple of embellishments.
This last creation was a real festive joy.
Until next year,

Merry Christmas to you and many blessings for the New Year!


Whimsy Stamps Products used:

Candle Light Rubber Cling StampEvergreen Trees Die Set*NEW Kinetic Curved Hills Die SetNuvo - Crystal Drops - Simply White

Thursday, December 20, 2018

Bundled Up - special guest - Kathy Schweinfurth


I've so enjoyed guesting with Whimsy Stamps over the last several months - thank you, Whimsy Stamps, for having me!  For my last Guest project, I couldn't resist using this wonderful Bundled Up Amped2Stamp set designed by Deb Davis!

For my card, I went with a soft winter look.  First layering a pale blue cardstock onto the base, I then created the background by using the Pinwheels Stencil and Nuvo Embellishment Mousse in Mother of Pearl and cutting out a circle. Can I just say I love this stencil!  It reminds me of snow, but I can also see 'sparklers' for New Years and July 4th! Within the circle, I stamped the trees from the Bundled Up Amped2Stamp set and cut some shimmery white cardstock for the 'snow'.  I can't get enough of these super sweet images that were copic colored and fussy cut.  For the sentiment, I used one of the dies in the Card Builders Window Die set to cut pale blue cardstock.

Wishing all of you a very blessed Christmas and Happy New Year!

Bundled Up Clear Stamps Pinwheels Stencil Card Builder Windows Die Set

Monday, December 17, 2018

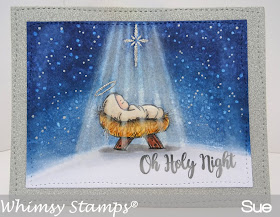
Oh Holy Night...

Hello everyone! Hope it's a happy Monday!

I have been playing with inky backgrounds and trying to make a ray of light!

This beautiful stamp set 
from 
is just perfect to try this background out!

Ingredients from
(UK friends, you can buy these from Dies To Die For)
Other Ingredients
Card Suitable for Alcohol Markers
Copic Markers
Background B39, B37, B34, Colourless Blender Pen, 
Skin V12, E00, E000
Swaddling, E40, E41, E43
Manger YR27, YR24, YR23, E23, E25, E27
Silver Gel Roll Pen
White Polychromos Pencil
Silver Glitter Card


Be sure to have a look around our
to see the gorgeous DT creations there and then to 
to engage in some essential retail therapy!
Thank you for popping by,
love from Sue...xxx

HAPPY B-DAY WHIMSY!!!!

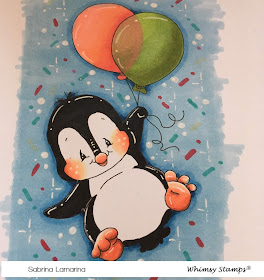
Hello friends of Whimsy Stamps, today is my turn of publication and with great joy I show you how I colored the sweetest   Penguin Flies - Digital Stamp on the birthday WHIMSY !!! As you may have noticed on IG the BLOG HOP is underway on the occasion of the 10th anniversary Whimsy .... what a thrill !! I leave you the link to participate in the BLOG HOP (you have time still until noon ET Monday 12/17 when we will randomly select 2 winners and each receive $ 25)


But now I show you my card and its coloring!

I used the Nuvo Marker, I started with the paws, the cheeks ( 387 - 373 - 374) and the little body ( BLACK)


With the white gel pen I draw the light points


Now I'm going to the balloons (I also create the transparency of orange also the part that should be seen from the green balloon) 
GREEN: 410 - 412 - 416
ORANGE: 373 - 392 - 377


Also on the balloons I draw the light with the white gel pen! With the blue those the contour of the penguin and then all the sky, revising with the color on the parts that I want in the shade


After coloring the whole sky with blue, I create colored confetti with the colors used for the balloons and the white gel pen


Now I just have to create my CAS!


Best wishes WHIMSY !!!
I remind you to participate in the Blog Hop IG!
click on the image below 


Kiss Sabrina